Did you know that a standard 500 square foot heated driveway can require as much dedicated power as three modern electric vehicle chargers running simultaneously? Most homeowners start their journey dreaming of a shovel-free winter, only to be met with technical jargon about 240V circuits and National Electrical Code Article 426. It’s completely normal to feel concerned about hidden costs like a 400-amp panel upgrade or the impact on your monthly energy bill. Understanding the specific electrical requirements for heated driveways is the first step toward a reliable, long-term solution that won’t leave you in the dark during a blizzard.
We’re here to provide the clarity you need to move forward with confidence. In this 2026 guide, you’ll learn how to calculate your property’s amperage needs and why sizing your circuits at 125 percent of the load is a non-negotiable safety standard. We’ll also provide a professional checklist for your electrician and demonstrate how automated moisture sensors can slash your operating costs by preventing energy waste. By the time you finish reading, you’ll have a master craftsman’s perspective on designing a snow melt system that is both powerful and efficient.
Key Takeaways
- Learn how to calculate your total energy footprint using the “Watts per Square Foot” rule to understand why a snow melt system is often a home’s largest appliance.
- Determine if your current service can support the electrical requirements for heated driveways by evaluating your main breaker capacity and the essential 80% load rule.
- Understand the role of automated controller options and sensors in protecting your system from failure while keeping energy costs manageable.
- Identify critical safety standards, including NEC Article 426 compliance and the specific requirement for 30mA Ground Fault Equipment Protection (GFEP).
- Access a step-by-step electrical audit template to help you document your existing panel and prepare for a professional consultation.
Understanding the Power Demands of Driveway Snow Melt Systems
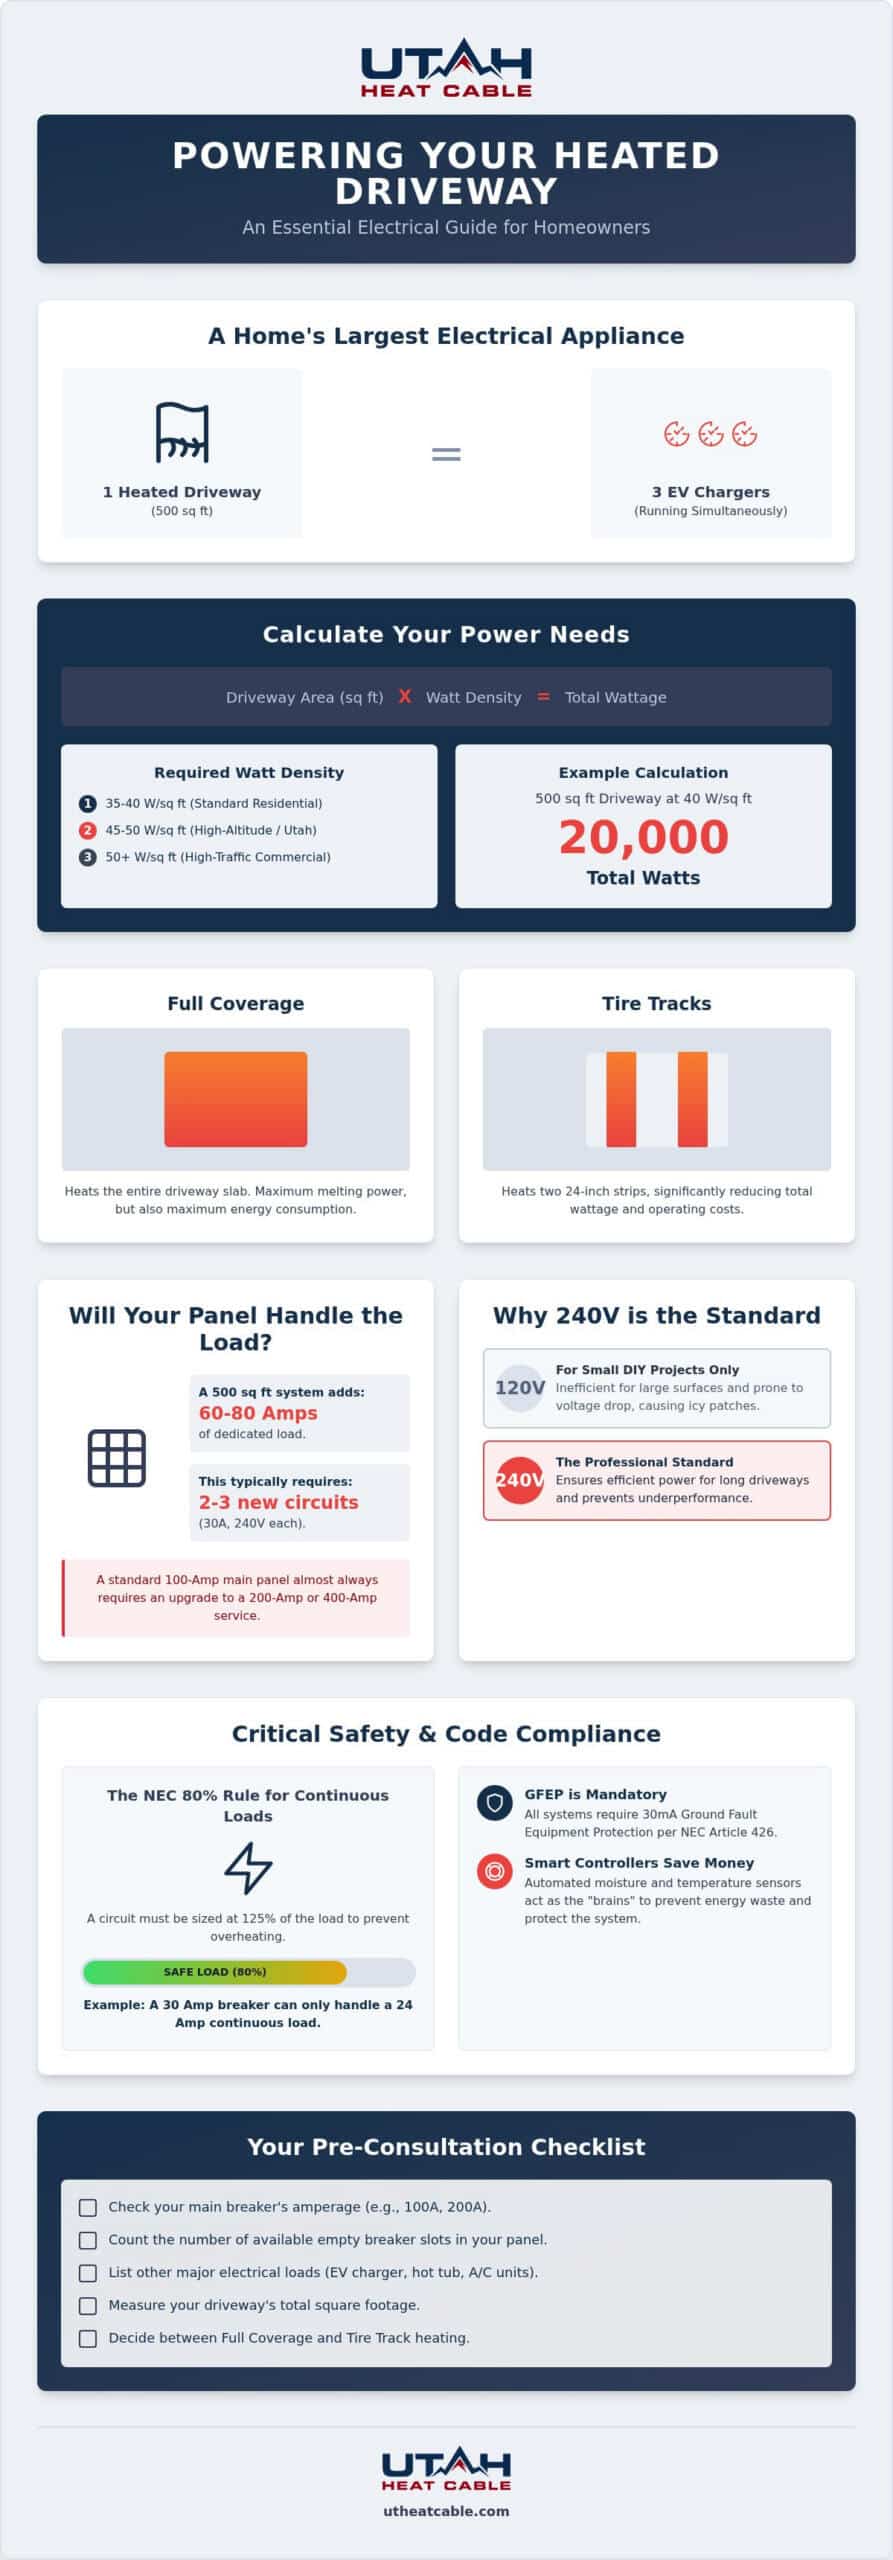
A Snowmelt system is the largest electrical appliance your home will ever host. While a central air conditioning unit might pull 20 amps, a standard 600 square foot heated driveway can demand over 100 amps. This is why grasping the electrical requirements for heated driveways is vital before you break ground. We calculate this load using the “Watts per Square Foot” rule. Most residential settings target 35 to 40 watts per square foot. Commercial properties with high traffic often require 50 watts to ensure snow doesn’t accumulate during constant use.
There are no “plug-and-play” versions of these systems for a permanent installation. Since the heating cables are embedded in concrete or asphalt, they must be hard-wired into dedicated circuits. This ensures the system has the high-amperage power needed to overcome the thermal mass of the driveway and the freezing temperatures outside. It’s a heavy lifter. Without a professional design, you risk installing a system that underperforms exactly when you need it most.
Calculating Your Total Square Footage Load
To find your total wattage, multiply your driveway’s square footage by the desired power density. A 500 square foot area at 40 watts per square foot equals a 20,000-watt load. You can reduce this demand by opting for “tire track” heating. This method targets two 24-inch wide strips where your vehicle actually drives, rather than heating the entire slab. In Utah’s climate, we also look at BTU requirements. High-altitude locations often need a higher watt density. The air is thinner and heat dissipates more quickly, meaning we might recommend 45 or 50 watts per square foot in mountain communities to maintain clear pavement.
The Difference Between 120V and 240V Systems
You might see 120V heating mats sold for small DIY projects like a single step or a landing. However, 120V is insufficient for a full driveway. It’s simply not efficient enough to move the energy required for large surfaces. We almost exclusively use 240V or 277V configurations for residential projects. Higher voltage allows for longer cable runs and reduces the amperage flowing through the wires. This is especially important for long driveways far from the power source. If we used lower voltage over a long distance, you’d experience voltage drop. This means the cables at the end of the driveway wouldn’t get hot enough to melt snow effectively, leaving you with icy patches despite the high energy use.
Sizing Your Electrical Service: Will You Need a Panel Upgrade?
Before you commit to a snow melt system, you must look at the “heart” of your home: the electrical panel. Most residential properties in our region operate on either a 100-amp or 200-amp main service. Because a heated driveway is a high-demand appliance, it often pushes these systems to their limit. If your home already supports an electric vehicle charger, a hot tub, or multiple air conditioning units, your remaining capacity might be lower than you think. Evaluating your current load is the first step in meeting the electrical requirements for heated driveways.
One critical technicality we always address is the “80% Rule.” Under the National Electrical Code, snow melt systems are classified as a continuous load because they may run for several hours during a storm. This means you cannot utilize 100% of a breaker’s rated capacity. Instead, the circuit must be sized at 125% of the calculated load. For example, a 30-amp breaker should only handle a 24-amp continuous load to prevent overheating and nuisance tripping. If you aren’t sure how much “headroom” your current panel has, our team can help you perform a custom snow melt design to see if your existing footprint can support the system.
Amperage Requirements for Common Driveway Sizes
A standard two-car driveway, typically measuring between 400 and 600 square feet, requires significant power. For a 400 to 500 square foot area, you should expect to need 2 to 3 dedicated 30-amp, 240V circuits. This is a major draw. A 500 square foot heated area generally requires an average amperage jump of 60 to 80 amps of dedicated service capacity. If you only have a 100-amp main panel, an upgrade to 200-amp or even 400-amp service is almost always necessary to ensure safety and reliability.
Sub-Panels and Dedicated Circuits
If your main service has the raw capacity but your panel is physically out of breaker slots, a dedicated sub-panel is the most efficient solution. We often recommend installing these sub-panels in the garage or an area close to the driveway. This proximity is vital. It minimizes the length of expensive, heavy-gauge copper wire runs, which reduces both material costs and voltage drop. In high-altitude or high-snow regions like Park City, any outdoor-rated enclosures must meet NEMA 3R or 4X standards to protect the components from driving snow and ice melt. This professional-grade protection ensures your system remains operational for the 30 to 50 years it’s designed to last.
Automated Snow Melt System Controllers: The Brains of the Operation
The raw power we discussed in previous sections is only effective if it’s managed correctly. While the cables provide the heat, the controller serves as the intelligence that tells the system when to work and when to rest. Meeting the electrical requirements for heated driveways involves more than just running heavy-gauge wire; it requires a control strategy that prevents energy waste. Without an automated controller, you’re left with a manual “on/off” switch. This often leads to two expensive problems: forgetting to turn the system off, which spikes your utility bill, or turning it on too late after the snow has already bonded to the pavement.
Modern 2026 controllers are precision instruments. They require a small, dedicated power source for their own internal logic, usually a standard 120V circuit, which is separate from the high-voltage power feeding the heating cables. These units now integrate seamlessly with smart home systems, allowing you to monitor your driveway’s status through mobile apps. You can receive alerts when the system activates or manually trigger a “pre-heat” cycle if a major storm is forecasted, ensuring your property remains protected even when you aren’t home.
Sensor Types: Aerial vs. In-Ground
To operate efficiently, the controller needs data from sensors. Aerial sensors are mounted on a roofline or pole where they have a clear view of the sky. They require a low-voltage wire run back to the controller and must be positioned away from dryer vents or chimneys that could give false temperature readings. In-ground, or slab sensors, provide the most accurate data because they measure the actual temperature of the concrete. These must be planned early, as they require dedicated conduit to be placed before the concrete is poured. We prefer “moisture plus temperature” sensors because they ensure the system only draws power when both freezing temperatures and precipitation are present.
Contactor Panels and Power Distribution
The controller itself isn’t designed to handle the massive amperage of the heating cables directly. Instead, it sends a signal to a contactor panel. This panel houses heavy-duty relays that physically close the high-voltage circuits. This separation of “brains” and “brawn” is a core safety standard. A contactor panel is essential for any system over 30 Amps because it acts as a heavy-duty relay, allowing a low-power signal from the controller to safely engage multiple high-amperage heating circuits simultaneously. These panels also include safety interlocks and manual overrides, which are vital for performing seasonal maintenance or testing the system before the first frost arrives.
Electrical Code Compliance and Safety Standards
Safety is the foundation of any successful snow melt installation. Because these systems operate at high voltages in wet, outdoor environments, they are governed by strict regulations. The primary authority is National Electrical Code (NEC) Article 426, which serves as the safety roadmap for fixed outdoor electric de-icing equipment. Adhering to these standards is not just about passing an inspection; it’s about protecting your property from electrical faults and ensuring your system operates reliably for decades. When we discuss the electrical requirements for heated driveways, we are looking at a system that must be engineered to withstand the harshest winter conditions without compromising the safety of your home.
A frequent point of confusion involves the type of breaker protection required. Many homeowners assume a standard Ground Fault Circuit Interrupter (GFCI), like the one in your bathroom, is sufficient. However, a standard 5mA GFCI breaker will cause constant nuisance tripping. This happens because long runs of heating cable have a small, natural amount of “leakage current” that is harmless but enough to trigger a sensitive GFCI. To solve this, NEC Article 426 requires Ground Fault Equipment Protection (GFEP) with a 30mA trip level. This specific equipment protection provides the necessary safety while allowing the system to run continuously through a storm. Proper grounding and bonding of any metal reinforcement, such as rebar or wire mesh within the concrete, is also essential. This creates a safe path for electricity and ensures the breaker trips immediately if a cable is ever damaged. If you manage a commercial property or facility, understanding the broader electrical requirements for heat trace systems is equally critical for ensuring code-compliant protection across all outdoor heating applications.
The Necessity of a Licensed Electrical Contractor
In Utah, Idaho, and Wyoming, the environmental demands on electrical systems are extreme. Attempting to use a “handyman” for a high-wattage snow melt system often leads to voided warranties and dangerous wiring errors. As a licensed electrical contractor, we ensure every connection meets local building department codes. This professional oversight is vital during the permitting and inspection process. Local Utah inspectors will specifically look for the correct burial depths and GFEP protection before signing off on the project. If you want to ensure your system is installed to the highest safety standards, you can request a professional quote from our licensed team today.
Cold-Weather Wiring and Conduit Specs
The physical protection of your wiring is just as important as the breakers in your panel. In Utah’s rocky or clay-heavy soils, we typically recommend Schedule 80 PVC conduit for its superior durability against ground shifting and moisture. While EMT (Electrical Metallic Tubing) is common in some regions, it can corrode over time when exposed to de-icing salts and groundwater. Trenching must reach specific depths, often 18 to 24 inches, to protect the lines from accidental damage during future landscaping. We also pay close attention to terminal connections, using weather-tight junction boxes to prevent moisture ingress, which is the leading cause of system failure in high-snow regions like Park City.
Electrical Preparation Template for Homeowners
Preparing for a snow melt installation requires more than just a desire for clear pavement; it involves careful coordination between your property’s current power capacity and the technical needs of the new system. While you don’t need to be an electrician to start the process, performing a preliminary audit can save you weeks of planning time and help avoid unexpected mid-project expenses. By documenting your home’s infrastructure now, you provide the necessary data for an accurate quote and a system that meets all electrical requirements for heated driveways without straining your main service.
Successful projects also rely on seamless communication between your paving contractor and your electrical specialist. Because the heating cables must be laid and tested before the concrete or asphalt is poured, the timing of the electrical rough-in is critical. If these two trades aren’t synchronized, you risk delays or, worse, damaging the heating elements during the paving process. Following a structured template ensures no detail is overlooked during these early stages.
Site Audit Checklist
Before reaching out for a professional consultation, walk through your property with these three steps in mind:
- Identify Your Main Service: Locate your main electrical panel and look at the large breaker at the very top. Note if it says 100A, 200A, or 400A. This single number determines the “ceiling” of your home’s power capacity.
- Measure the Run Distance: Use a tape measure or a rolling wheel to find the distance from your electrical panel to the furthest edge of the driveway. Longer distances require heavier gauge wire to prevent voltage drop, which impacts the final cost.
- Count Available Breaker Slots: Open your panel door and look for empty spaces. A standard residential system typically needs at least two to four empty “double-pole” slots to accommodate the 240V circuits required for the heating cables.
Contractor Interview Guide
Not every electrician has experience with the specific nuances of NEC Article 426. When vetting potential installers, use these targeted questions to ensure they understand the specialized nature of snow melt work:
- “Have you installed 30mA GFEP breakers for snow melt systems before, and do you understand why standard GFCIs won’t work here?”
- “Will you provide a formal load calculation based on my specific square footage to ensure my main panel isn’t overstressed?”
- “Do you handle the final calibration of the automated moisture sensors and the controller logic?”
Ready for a professional design that matches your home’s unique footprint? Request a custom load calculation from Utah Heat Cable to ensure your system is engineered for maximum efficiency and safety.
Secure Your Property with a Professional Electrical Foundation
Integrating a snow melt system is a significant investment in your safety and your property’s long-term value. By mastering the electrical requirements for heated driveways, you’ve gained the knowledge needed to avoid hidden costs and technical pitfalls. From evaluating your main breaker capacity to choosing automated controllers that prevent energy waste, these technical choices ensure your driveway remains clear without overstressing your home’s infrastructure. It’s about building a system that works as hard as you do when the storm hits.
Our team is here to help you navigate these complexities with the precision of a master craftsman. As a licensed Utah electrical contractor, we provide the custom load calculations and specialized automated controls that a project of this scale demands. We take pride in designing systems that are durable, safe, and perfectly matched to your property’s existing footprint. We don’t just install cables; we provide the peace of mind that comes from professional-grade protection.
Get a Professional Snow Melt Design & Electrical Audit
With the right electrical foundation in place, you can look forward to the first snowfall with total peace of mind. You’ll never have to dread the morning forecast again.
Frequently Asked Questions
Do I need a 200 Amp panel for a heated driveway?
Most homes require at least a 200-amp or 400-amp service to safely support the electrical requirements for heated driveways. A typical 100-amp panel is generally insufficient because the heating load for a standard driveway can consume 60 to 100 amps on its own. If your home already supports modern appliances or an EV charger, an upgrade is often necessary to prevent overloading your main breaker.
How much does it cost to run a heated driveway per hour in Utah?
Operating costs are determined by the square footage of the heated area and your local utility rates. For a standard 400 square foot driveway, you can expect an estimated operating cost of $3.20 per hour based on an average electricity rate of $0.16 per kWh. Utilizing automated controllers ensures the system only draws power during active snowfall, which keeps seasonal costs comparable to or lower than professional plowing services.
Can I use a manual switch instead of an automated controller?
You can use a manual switch, but it often leads to system inefficiency and high utility bills. If you don’t activate the system before the snow begins to fall, a bond will form between the ice and the pavement, making it much harder to melt later. Automated sensors are a superior choice because they detect moisture and temperature simultaneously, activating the heat exactly when it’s needed and turning it off once the surface is dry.
What is the difference between GFCI and GFEP for snow melting?
The difference lies in the sensitivity of the protection. A standard GFCI trips at 5mA to protect humans from shocks, but snow melt systems have a natural amount of leakage current that would cause a GFCI to trip constantly. NEC Article 426 requires Ground Fault Equipment Protection (GFEP) with a 30mA trip level. This specific rating provides the necessary safety for the equipment while allowing the system to run reliably through heavy winter storms.
Does a heated driveway require a dedicated electrical sub-panel?
A dedicated sub-panel isn’t always a requirement, but it’s often the most cost-effective and practical solution. If your main panel is physically full or located far from the driveway, a sub-panel reduces the length of expensive copper wire runs. This configuration also makes it easier to house the contactor panel and provides a centralized location for future maintenance and testing by our team.
Can I install the electrical components of a snow melt system myself?
No, you should never attempt to install these electrical components yourself. These systems involve high-voltage power and must strictly adhere to NEC Article 426 to remain safe and code-compliant. DIY installations often lead to voided manufacturer warranties and dangerous wiring errors. As a licensed contractor, we ensure every connection is moisture-tight and that the system is calibrated for the specific climate challenges of the Mountain West.
What happens if the power goes out during a snowstorm?
If the power fails, the heating cables will stop generating heat and snow will begin to accumulate on the driveway. Once the power is restored, the system will automatically restart, but it will have to overcome the thermal mass of the accumulated snow. This “cold start” takes longer than melting snow as it falls, but our custom designs include the necessary power density to recover the surface as quickly as possible.
How long does the electrical installation portion of the project take?
The electrical work is typically completed in two phases over three to five days. The first phase involves the rough-in and conduit placement, which must be finished before the concrete or asphalt is poured. After the driveway has cured, we return for the final phase to install the breakers, controller, and sensors. If your project requires a utility transformer upgrade, this can add several weeks to the overall timeline, so early planning is essential.