
What if the very system designed to protect your roof actually poses the greatest risk to your home’s safety? It’s a valid concern for property owners across Utah, Idaho, and Wyoming, where heavy snow and north-facing slopes make ice dam prevention a necessity. You want the security of a clear roofline, but you don’t want to worry about improper spacing causing a fire or non-regulated cables driving up your energy costs. Professional constant wattage heat cable installation requires a precise balance of electrical expertise and seasonal foresight to ensure your home remains a safe haven.
We understand that navigating technical specifications can feel overwhelming, especially with the new NEC Section 424.48 requirements taking effect on January 1, 2026. This guide is designed to help you master the safety protocols and technical calculations needed for a code-compliant de-icing system. We’ll walk through everything from GFCI protection and wattage outputs to the specific maintenance routines that ensure long-term performance. By the end, you’ll have the expert knowledge required to safeguard your home against the harshest winter elements while maintaining peak energy efficiency through a durable, professionally designed solution.
Key Takeaways
- Learn why constant wattage cables provide the steady, unchanging heat output required for long gutter runs and commercial de-icing applications.
- Master the technical spacing rules for residential eaves to ensure your zig-zag patterns provide maximum protection against stubborn ice dams.
- Follow a professional constant wattage heat cable installation process that includes essential insulation resistance testing before the cable is ever mounted to your roof.
- Understand the critical electrical requirements for dedicated circuits and why a 30mA GFEP is necessary to avoid the nuisance tripping common with standard outlets.
- Protect your property and investment by ensuring your system meets the certified standards required for valid manufacturer warranties and insurance coverage.
Understanding Constant Wattage Heat Cable for Roof De-Icing
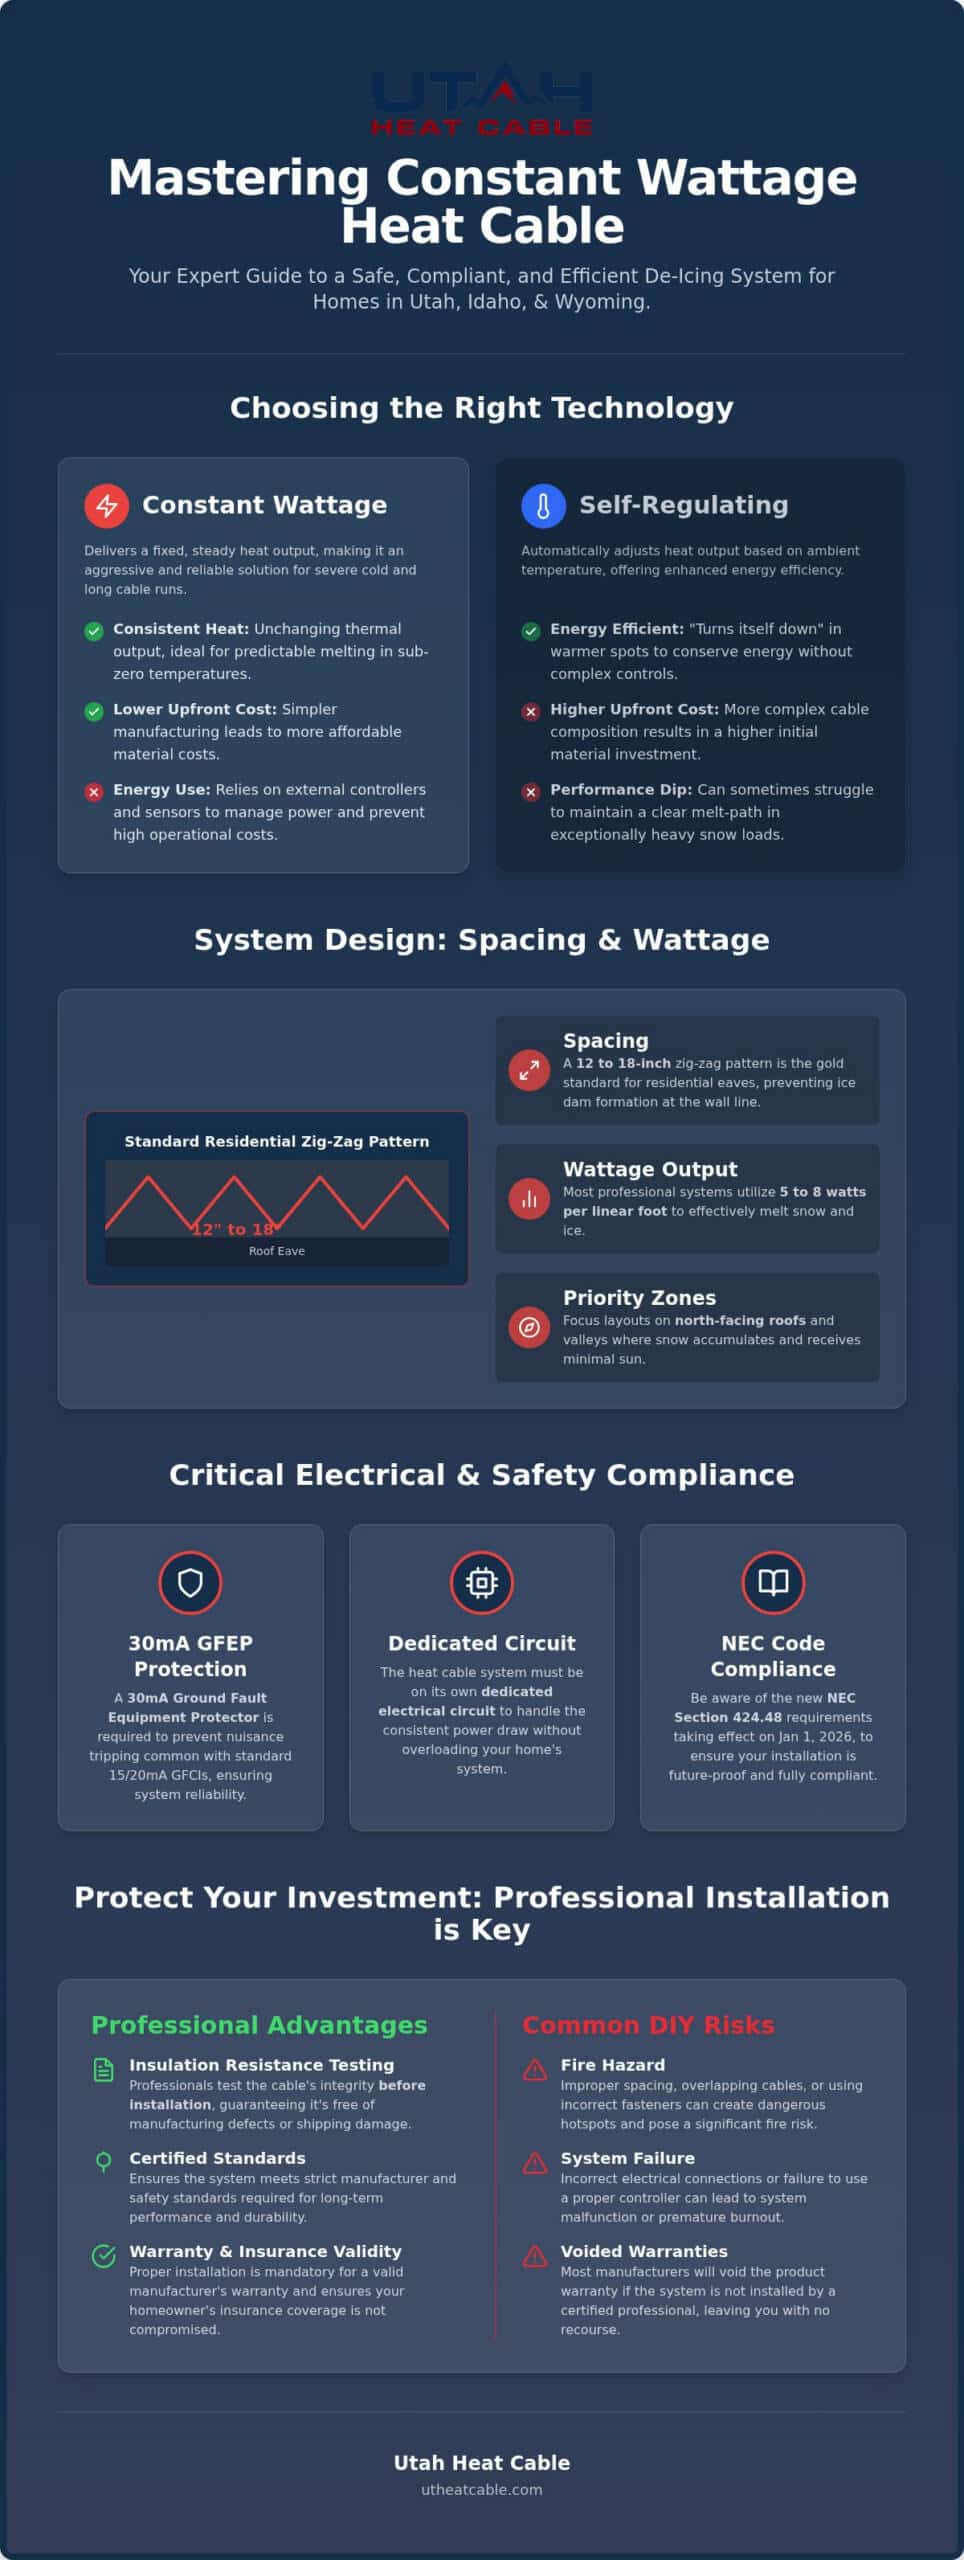
Constant wattage heat cable operates on a simple, reliable principle: it delivers a fixed amount of thermal energy per linear foot regardless of the external temperature. While self-regulating cables adjust their heat output based on the surrounding air, constant wattage systems maintain a steady state of power as long as they are energized. This predictable performance makes constant wattage heat cable installation a preferred choice for specific architectural challenges, particularly when consistent melting power is the highest priority.
In the rugged environments of Idaho and Wyoming, where sub-zero temperatures are common, this “always-on” heat output provides a distinct advantage. When temperatures plummet, self-regulating cables can sometimes struggle to maintain a clear melt-path if the snow load is exceptionally heavy. Constant wattage cables offer an aggressive thermal response that cuts through deep snow packs, ensuring that meltwater has a clear route to the ground before it can refreeze into a destructive ice dam.
From a financial perspective, these systems often feature lower upfront material costs. The cable itself is less complex to manufacture than its self-regulating counterparts. However, because the cable does not “turn itself down” when the weather warms up, these systems rely heavily on external controllers and sensors to manage energy consumption. Without a professional control strategy, the operational costs can climb quickly during a long Mountain West winter.
When to Choose Constant Wattage Over Self-Regulating
We typically recommend constant wattage for long, straight runs in commercial gutters or industrial applications where the roofline is expansive. Because these cables don’t experience the high “inrush current” common with self-regulating systems during cold starts, they are often easier to manage on large-scale circuits. For a detailed comparison of these technologies, you can explore our guide on self regulating vs constant wattage heat cable to see which fits your specific roof pitch and budget.
Material Composition and Durability
The core of a high-quality constant wattage cable consists of a nichrome heating element wrapped around two parallel bus wires. This is protected by high-grade fluoropolymer insulation. In high-altitude regions like Utah, the sun’s intensity can be just as damaging as the snow. We utilize cables with specialized UV-resistant outer jackets to prevent the brittleness and cracking that often plague cheaper, retail-grade heat tapes. This durability ensures the cable remains flexible enough to navigate tight valleys and downspouts while withstanding decades of seasonal expansion and contraction.
Designing Your Layout: Spacing and Wattage Calculations
A successful constant wattage heat cable installation begins long before the first clip is fastened. It starts with a precise calculation of the “Heat Pattern,” which determines exactly how much cable is needed to cover the vulnerable eaves of your home. For most residential roofs in Utah, a zig-zag pattern is the gold standard. We typically use a spacing rule of 12 to 18 inches between the peaks of the triangles. This ensures the cable covers the area where the roof meets the exterior wall, which is precisely where ice dams tend to form.
Matching the cable’s wattage to your property’s specific risk is equally important. Most professional systems utilize an output of 5 to 8 watts per linear foot. If your home has a history of massive ice accumulation or complex architectural valleys, we might opt for a higher-density layout rather than simply increasing the wattage. You also need to factor in the gutter and downspout allowance. A professional design includes enough extra length to loop the cable down into the drainage system, which prevents meltwater from refreezing inside your pipes. If you aren’t sure how much cable your specific roofline requires, our team can provide a custom heat-trace design tailored to your home’s unique architecture.
Mapping the Roof Eaves and Valleys
North-facing roofs are the primary battleground for ice dam prevention. These areas receive the least amount of winter sun, meaning snow stays longer and ice builds thicker. In these zones, and within roof valleys where snow naturally collects in high volumes, we often design a “double-run” layout to handle the increased load. A successful layout ensures a consistent melt-path, which is defined as the 2-inch radius of clear roof surface maintained around the energized cable. This clear path allows water to flow freely even during heavy storms.
Avoiding the Fatal Flaw: Overlap Prevention
The most critical safety rule for constant wattage systems is that the cables must never touch or cross. Because these cables emit a steady, non-regulated stream of heat, overlapping them creates a thermal hotspot. This concentrated heat can melt through the protective insulation and cause a short circuit or even a fire. To prevent this, we use chalk lines to map out the exact path on the roof before the installation begins. We also rely on specialized hardware, such as heavy-duty spacing clips, to maintain a permanent, safe distance between every run of cable. Precision here isn’t just about performance; it’s about protecting your home from avoidable electrical hazards.
Step-by-Step Guide to Constant Wattage Heat Cable Installation
A professional constant wattage heat cable installation begins with a critical step often skipped by amateurs: the insulation resistance test, commonly known as a Megger test. We perform this test while the cable is still on the ground to ensure there are no manufacturing defects or shipping damage before it’s permanently mounted to your roof. Once the cable is verified, surface preparation becomes the priority. Removing leaves, silt, and debris from gutters and eaves ensures proper heat transfer and allows for the secure adhesion of mounting hardware.
Securing the cable requires a methodical approach to maintain the engineered pattern we designed in the previous stage. It’s during this phase that we must be most vigilant about overlap prevention. Because constant wattage cables don’t self-regulate, any point where cables touch will create a thermal runaway situation, eventually melting the insulation and causing a system failure. We use specialized spacers to maintain a strict physical gap, ensuring the system remains safe and effective throughout the winter.
For downspout routing, we don’t simply drop the cable into the pipe. We use specialized weights or downspout hangers to keep the cables centered. This prevents them from sagging or bunching at the bottom, which could create a blockage or a dangerous thermal hotspot. Properly weighted cables remain in place even when heavy slush moves through the drainage system.
Hardware and Attachment Methods
The choice of hardware depends entirely on your roof material. We select fasteners that provide long-term durability without compromising the integrity of your roofing system:
- Shingle Clips: Heavy-duty aluminum clips that slide under asphalt shingles to provide a mechanical grip without penetrations.
- Standing Seam Clamps: Specialized stainless steel clamps for metal roofs that lock onto the seam to avoid drilling.
- Mechanical Fasteners: We avoid using only adhesive-backed pads, as they often fail during the extreme temperature swings of Utah and Idaho winters.
Maintaining proper cable tension is vital to prevent “wind-chatter.” If a cable is too loose, the constant vibration against the roof surface can wear down the outer jacket, leading to premature failure of the heating element.
Testing and Commissioning the System
After the physical installation is complete, we conduct a second Megger test. This post-installation check verifies that no clips or tools accidentally pierced the cable jacket during the mounting process. We then perform an initial power-up to measure the actual current draw against our original design specifications. This ensures the system is operating within the safe limits of your dedicated circuit. We record these baseline resistance values in your project documentation, providing a reference point for future maintenance checks and ensuring your peace of mind for seasons to come.
Electrical Requirements and NEC Code Compliance
Electrical safety is the backbone of any reliable de-icing system. When performing a constant wattage heat cable installation, adhering to National Electrical Code (NEC) Article 426 is not optional; it’s a fundamental requirement for fire safety and system longevity. One of the most common mistakes we see is the use of standard 5mA household GFCI outlets. These are designed for bathrooms and kitchens, not for heat-trace systems. Heat cables naturally have a tiny amount of capacitive leakage that will trip a standard GFCI almost immediately. Instead, code requires a 30mA Ground Fault Equipment Protection (GFEP) breaker. This higher threshold prevents “nuisance tripping” while still providing the necessary safety shut-off in the event of a fault.
Your de-icing system must have its own dedicated circuit. Sharing power with outdoor lighting or a garage outlet often leads to overloaded breakers exactly when you need the heat most. Additionally, we must verify the voltage requirements before the project begins. Installing a 240V cable on a 120V circuit results in a system that barely gets warm, while the reverse will cause the cable to burn out rapidly. As licensed electrical contractors, we ensure your panel is equipped to handle the specific load of your de-icing equipment. If you’re ready to ensure your home meets these rigorous safety standards, you can schedule a professional electrical assessment today.
Automated Controllers and Sensors
Efficiency depends on how the system is triggered. A simple thermostat only measures ambient temperature, which can lead to the system running on clear, dry days. We prefer “Snow-Stats” or moisture sensors that only activate the cable when both freezing temperatures and moisture are present. By 2026, smart home integration has become standard, allowing you to monitor current draw and system status directly from your phone. This level of control provides peace of mind and significantly lower energy bills. Manual override switches are also installed, giving you the ability to force the system on during unusual weather events.
Professional Junction Box Installation
All outdoor connections must be housed in NEMA 3R or 4X weatherproof enclosures to protect against driving rain and melting snow. We incorporate drip loops at every entry point, which is a simple downward curve in the cable that forces water to drop off before it can follow the wire into the electrical box. The Cold Lead is defined as the non-heating section of the cable that safely transitions the power from the junction box to the start of the heating element on the roof. Proper management of these transition points is what separates a long-lasting professional install from a temporary fix.
Professional Installation vs. DIY: Protecting Your Investment
Choosing a constant wattage heat cable installation is an investment in your property’s longevity. While “big box” store kits suggest anyone with a ladder can handle the job, the reality of high-altitude winters tells a different story. The stakes are higher than just a few icicles. Many homeowners insurance policies contain clauses regarding professional electrical work. If an uncertified heat tape installation leads to fire damage, you might find yourself facing the entire repair bill without help from your insurer. Insurance providers often look for permits and professional signatures when evaluating claims related to electrical fires.
Manufacturer warranties add another layer of complexity. High-grade constant wattage cables are designed to last for decades, but those protections often hinge on professional commissioning. A certified installer must sign off on the insulation resistance tests we discussed earlier to ensure the system was handled correctly from day one. Beyond the cable itself, your roof warranty is at risk. Amateur fastening methods that involve driving screws through shingles or using improper adhesives can void the protection provided by your roofing manufacturer. We use non-penetrating clips that preserve the integrity of your shingles while providing a mechanical grip that lasts.
The Risk of Amateur Mistakes
Amateur layouts often suffer from improper spacing, which leads to localized hot spots that can bake your shingles until they become brittle and fail. We also see frequent issues with inadequate circuit sizing. An amateur might plug the system into an existing outdoor outlet, only to have the breaker trip repeatedly during the coldest nights when the system is needed most. Over time, poorly secured cables experience “creep,” where the weight of sliding snow pulls the cable out of its pattern. This displacement doesn’t just stop the de-icing; it can physically pull gutters away from the fascia.
Custom Solutions for Utah, Idaho, and Wyoming
Standard retail kits are rarely built for the heavy snow loads seen in the Mountain West. Our team specializes in winterizing your roof with heat cable using industrial-grade components that withstand the intense UV exposure and massive ice accumulation typical of our region. Being based in Salt Lake City allows us to provide rapid troubleshooting and local expertise that national retailers simply can’t match. We understand the specific regional codes for Utah, Idaho, and Wyoming, ensuring your system is both safe and compliant. Don’t leave your home’s safety to chance. Contact Utah Heat Cable for a professional design today.
Secure Your Property Before the First Frost
A reliable de-icing system is about more than just melting snow; it’s about the precision of the electrical work and the integrity of the design. We’ve explored how a code-compliant constant wattage heat cable installation requires specific 30mA GFEP protection and meticulous spacing to avoid dangerous thermal hotspots. By prioritizing a layout that protects north-facing eaves and high-volume valleys, you ensure that meltwater always has a clear path to the ground. These technical details are what separate a system that fails during a blizzard from one that provides decades of worry-free protection.
As a licensed electrical contractor, we take pride in delivering custom engineered de-icing designs across Utah, Idaho, and Wyoming. We don’t just lay cable; we build a protective shield for your home that meets the rigorous NEC standards of 2026. If you’re ready to move from seasonal anxiety to absolute peace of mind, our team is here to help you prepare. Get a Professional Heat Cable Installation Quote today and ensure your roof is ready for whatever the mountains send your way. We look forward to helping you protect your home.
Frequently Asked Questions
Can I cut constant wattage heat cable to length?
No, you cannot cut constant wattage heat cable to length. These cables are manufactured with a fixed resistance for a specific pre-determined length. If you cut the cable, you break the electrical circuit and render the entire system useless. This is a major difference compared to self-regulating cables. It’s vital to measure your roof eaves accurately before ordering to ensure the cable fits your layout perfectly.
Does constant wattage heat cable need a controller?
Yes, constant wattage heat cable absolutely requires an external controller or sensor. Because these cables deliver the same amount of heat regardless of the outside temperature, they don’t have the ability to turn themselves off. Without a controller, the system would run continuously, leading to unnecessarily high energy bills and potential overheating. We typically install moisture or ambient temperature sensors to automate the system for maximum efficiency.
What happens if constant wattage heat cables touch or overlap?
You must never allow constant wattage heat cables to touch or overlap. Because these cables emit a steady stream of thermal energy, any contact creates a concentrated hotspot that can melt the protective insulation. This thermal runaway is the leading cause of fire hazards and system failure. During a professional constant wattage heat cable installation, we use specialized spacers to ensure a safe physical gap is maintained between every run.
How much electricity does a constant wattage roof cable use?
The electricity usage depends on the cable’s wattage rating and the total linear footage installed. Most residential systems draw between 5 and 8 watts per linear foot. If your roof requires 150 feet of cable, the system will pull between 750 and 1,200 watts while active. Using an automated controller ensures the system only draws power when snow or ice is actually present, which helps manage monthly operating costs.
Can I install constant wattage cable on a metal roof?
Yes, you can safely install these cables on metal roofs by using the correct attachment hardware. We utilize specialized standing seam clamps that lock onto the ribs of the metal panels. This method avoids any penetrations that could cause leaks or void your roof warranty. These mechanical fasteners are much more durable than adhesive pads, ensuring the cable stays in place during heavy snow slides typical of Wyoming winters.
How long does professional constant wattage heat cable last?
A professional constant wattage heat cable installation typically lasts between 10 and 20 years when high-grade materials are used. The specific lifespan depends on the quality of the cable’s UV-resistant jacket and the environmental conditions of your region. Regular maintenance and ensuring that clips remain securely fastened will help maximize this investment, providing long-term protection against the heavy snow loads common in Utah and Idaho.
What is the difference between constant wattage and self-regulating cable?
The primary difference is how they manage heat output. Constant wattage cables provide a steady, unchanging level of heat as long as they are powered. Self-regulating cables have a specialized core that allows them to increase heat in cold spots and decrease it in warmer areas. Constant wattage is often preferred for long, straight runs in commercial gutters because it offers more aggressive melting power at a lower initial material cost.
Is a dedicated circuit required for roof heat cables?
Yes, a dedicated circuit is almost always required for a safe installation. National Electrical Code standards generally mandate that de-icing systems have their own circuit to prevent overloading existing outdoor lines. This dedicated power source also allows for the installation of the required 30mA GFEP breaker. Proper circuit sizing ensures that your heat cables have the consistent power they need to function during the coldest, most demanding nights of the year.