
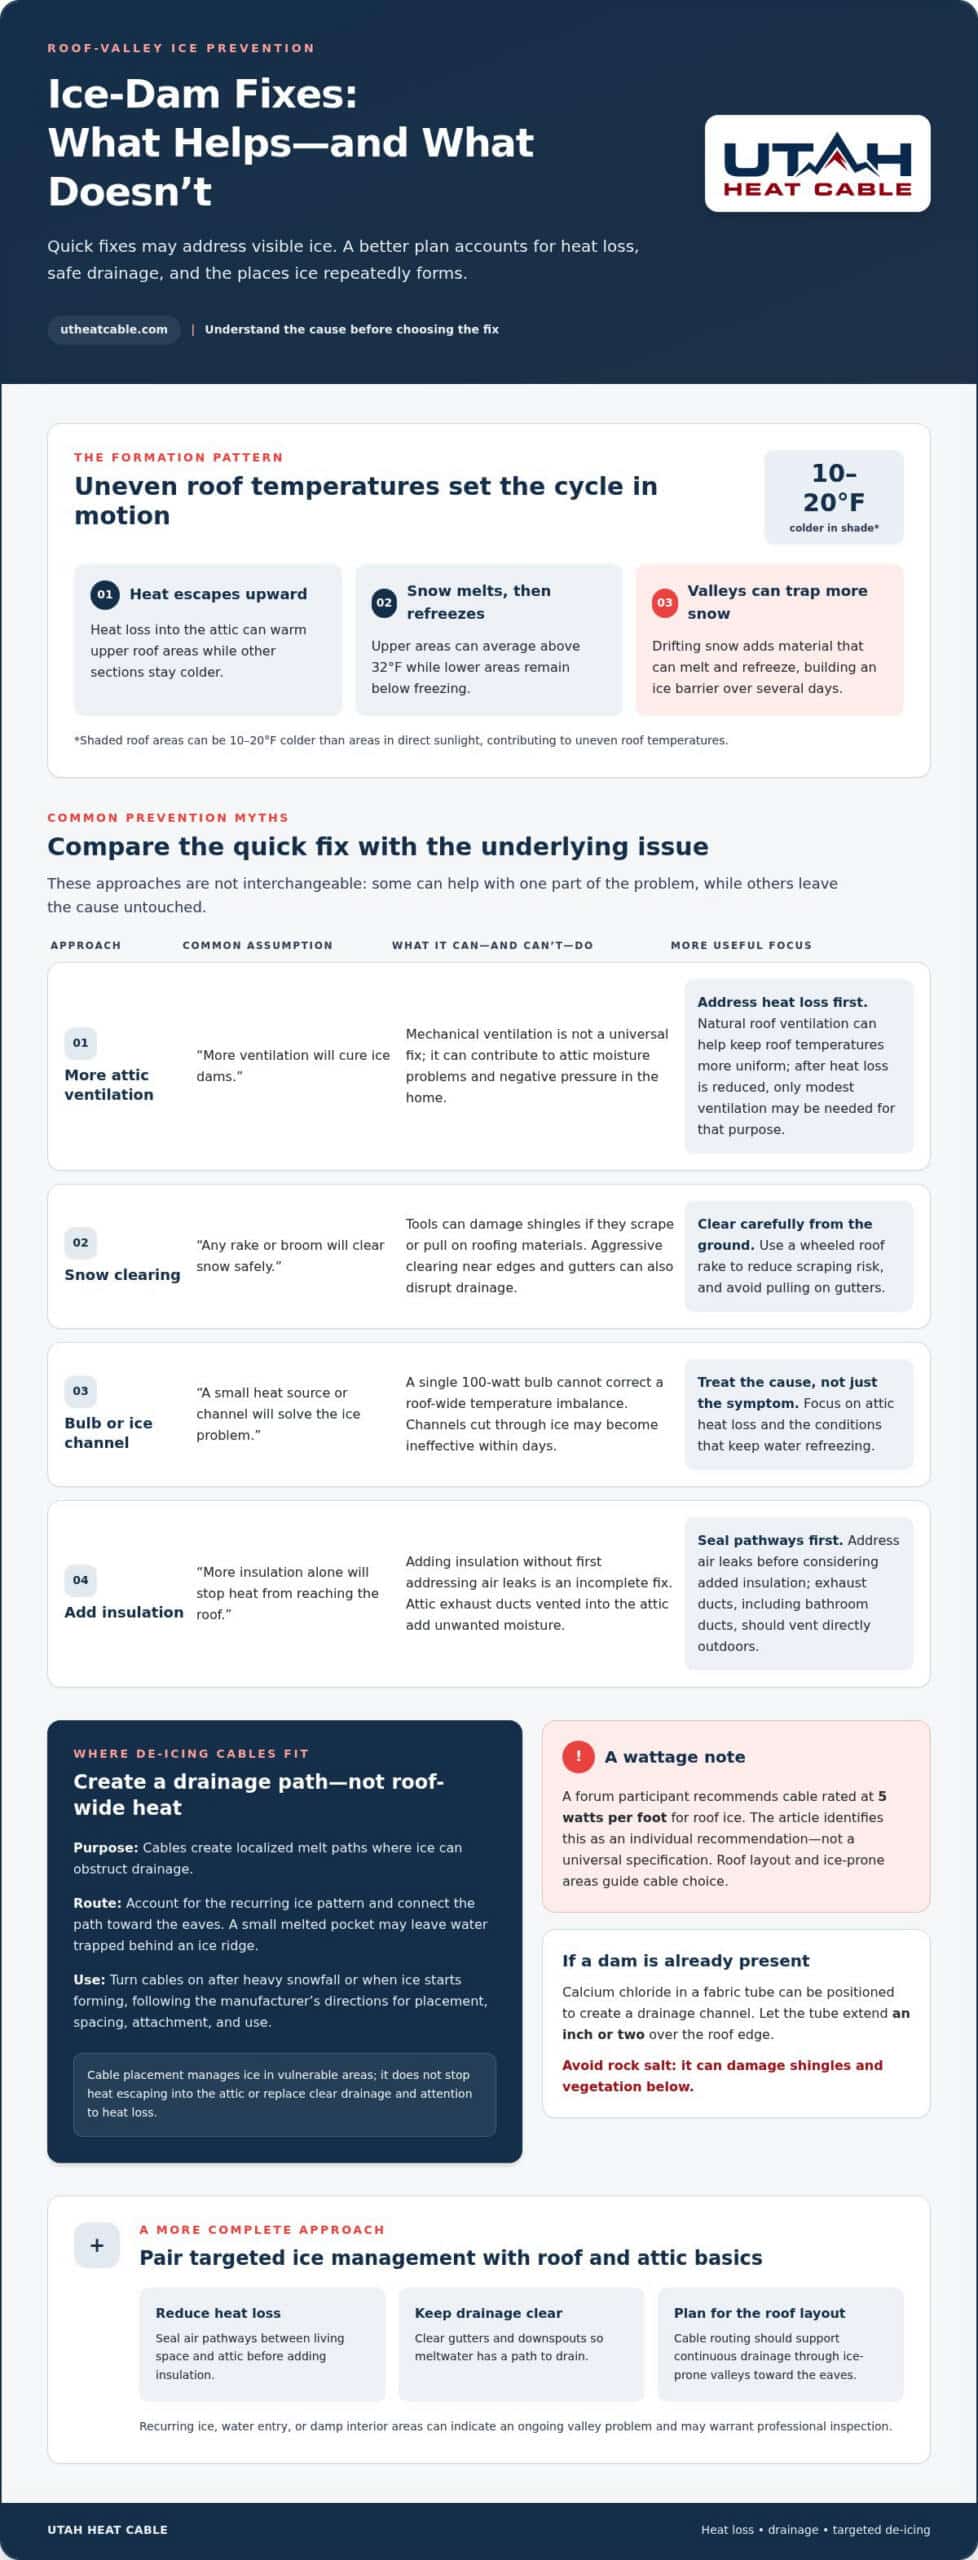
Ice dams usually begin with uneven roof temperatures, not simply cold weather. When snow is present, the upper roof can average above 32 degrees F while lower areas remain below freezing, allowing meltwater to refreeze; that’s why preventing ice buildup in roof valleys starts with understanding how snow, heat loss, and drainage interact. Valleys can collect drifting snow, giving ice more opportunity to build up.
It’s understandable to assume that more attic ventilation or a quick snow-clearing fix will solve the problem, but preventing ice buildup in roof valleys depends on addressing the conditions that cause ice to form. This guide explains how ice dams develop, which prevention ideas need a closer look, and how de-icing cables can help maintain drainage paths where ice tends to accumulate. You’ll also see how cables complement measures such as reducing heat loss and keeping roof drainage clear.
Key Takeaways
- Look beyond outdoor temperatures: heat escaping into the attic can warm parts of the roof and contribute to repeated melting and refreezing.
- Clear gutters and downspouts so meltwater has a path to drain, and use snow-removal tools carefully to avoid harming roofing materials.
- Question quick fixes: channels cut through ice can become ineffective within days, while a single bulb won’t correct uneven roof temperatures.
- De-icing cables can help maintain drainage paths where ice tends to build up; follow the manufacturer’s instructions for placement and use.
What ice dams are and how they form
An ice dam is a ridge of frozen meltwater that blocks drainage at a roof edge or valley. With snow on the roof, ice can form when upper sections average above 32 degrees F while lower sections stay below freezing. Daytime melting followed by overnight refreezing builds the barrier over several days. Valleys can collect windblown snow, leaving more material to melt and refreeze.
Heat escaping from the house into the attic can warm upper roof areas, while shade keeps other sections colder. Shaded roof areas can be 10-20 degrees colder than areas in direct sunlight. This uneven temperature pattern helps explain why one valley may ice over while another roof section stays clear. Repeated melting can drive water beneath shingles and into the attic.
Leaks can stain ceilings and walls, damage belongings, and leave damp areas where hidden mold or mildew can grow. Mold and mildew may contribute to respiratory problems, even when damage isn’t visible. Ice dams are most common in northern climates, where snow and repeated freezing and thawing combine.
To melt an existing dam, calcium chloride can be placed in a fabric tube positioned to create a drainage channel. Let the tube extend an inch or two over the roof edge. Don’t use rock salt instead, as it can damage shingles and the vegetation below.
There isn’t one underlayment requirement for every roof valley. Local building codes and the roof assembly determine which ice-barrier materials are needed and where they belong. Follow applicable roofing guidelines alongside local requirements, since coverage details vary by jurisdiction and roof design.
A roof valley should direct meltwater toward the eaves, while attic airflow moves from the soffits along the underside of the roof and exits through roof vents. To clear snow, use a wheeled roof rake from the ground, taking care not to scrape shingles or pull on gutters. Arrange a professional inspection if recurring ice, water entry, or damp interior areas suggest an ongoing valley problem.
Common ice dam prevention myths
Mechanical attic ventilation is sometimes treated as a cure for ice dams, but it isn’t a universal solution. Mechanical systems can contribute to attic moisture problems and negative pressure inside the home. Natural roof ventilation can help keep roof temperatures more uniform. If heat loss has been reduced, only modest ventilation may be needed for that purpose.
Not every snow-removal tool is harmless. A roof rake or push broom can clear snow, but contact with shingles may damage roofing materials. A wheeled rake can reduce the risk of scraping shingles. Avoid aggressive scraping, particularly near roof edges and gutters, where damage can disrupt drainage.
A single 100-watt bulb won’t spread heat far enough to correct a roof-wide temperature imbalance. Cutting channels through an ice dam can release trapped water temporarily, but those channels may become ineffective within days. These tactics address visible symptoms, not heat escaping into the attic or the conditions that keep water refreezing.
Adding insulation without first addressing air leaks is an incomplete fix. Seal pathways between the living space and attic before considering additional ceiling or roof insulation. Professional air sealing and proper insulation help address heat loss at its source. Attic exhaust ducts, including bathroom ducts, should also vent directly outdoors rather than into the attic, where they add unwanted moisture.
Installing de-icing cables
De-icing cables create localized melt paths where ice can obstruct drainage. To prevent ice buildup in roof valleys, the cable route should account for the recurring ice pattern and connect to a drainage path toward the eaves. The goal is to help meltwater escape, not to heat the entire roof or correct attic heat loss.
Roof shape, valley layout, and drainage all affect cable placement. A route that melts only a small pocket may leave water trapped behind an ice ridge, so the planned path should support continuous drainage. Follow the manufacturer’s instructions for installation, spacing, and attachment instead of improvising around shingles or gutters.
Turn cables on after heavy snowfall or when ice starts forming, following the manufacturer’s directions. A forum participant recommends cable rated at 5 watts per foot for roof ice, but that is an individual recommendation, not a universal specification. The roof system and ice-prone areas guide the cable choice and layout.
Cables manage ice in vulnerable roof areas, but they don’t stop indoor heat from escaping into the attic. Pairing a suitable cable route with clear drainage and attention to heat loss provides a more complete approach to preventing ice buildup in roof valleys. Treat cable placement as one part of roof maintenance, not a substitute for addressing conditions that contribute to repeated icing.
Explore de-icing system options for a solution suited to your roof’s ice-prone areas.
Utah Heat Cable: De-Icing Services
Utah Heat Cable offers De-Icing Services for roof areas where recurring ice interferes with drainage. If a valley repeatedly traps snow and ice, de-icing cables can help maintain a meltwater path; they manage ice buildup rather than correcting attic heat loss or replacing roof maintenance.
The right approach depends on the roof layout and where ice forms. Utah Heat Cable offers Self Regulating Heat Cable, Constant Wattage Heat Cable, and Controller Options for de-icing systems. These options can be considered as part of a system suited to the roof’s ice-prone areas. Learn more about de-icing services and system options.
If recurring ice in a roof valley is affecting drainage, contact Utah Heat Cable to discuss de-icing services for your property.
Plan Ahead for the Next Freeze
Make the next cold season easier to manage by treating recurring roof-valley ice as a planning signal, not a winter surprise. Keep track of where ice returns, how water drains, and which roof areas need attention. This information provides a practical starting point for preventing ice buildup in roof valleys and choosing measures suited to your roof before snow arrives.
Utah Heat Cable offers Self Regulating Heat Cable, Constant Wattage Heat Cable, and De-Icing Services for managing ice in vulnerable areas. Explore the options and consider how they may fit your roof’s needs. Visit Utah Heat Cable to explore de-icing solutions and take a prepared, steady approach to winter protection.
Frequently Asked Questions
What causes ice dams?
Uneven roof temperatures cause ice dams when snow melts on warmer areas and refreezes over colder ones. Air leaking from heated rooms into the attic can warm parts of the roof, while shaded or lower sections stay frozen. For example, a valley that traps drifting snow may keep accumulating meltwater and ice even when nearby roof sections drain freely.
Are ice dams dangerous?
Yes. Water trapped behind an ice dam can seep beneath shingles and damage ceilings, walls, and belongings. Moisture may also remain hidden, creating conditions for mold and mildew that can contribute to respiratory problems. If you notice damp drywall or a ceiling stain below an icy roof area, treat it as a possible leak and address the moisture promptly.
Are icicles a sign of an ice dam on your roof?
Icicles can accompany an ice dam, but their presence alone doesn’t prove one has formed. Look for a ridge of ice at the roof edge, backed-up meltwater, or dampness indoors near the eaves. A few icicles along a clear roof edge may not indicate trapped water, while icicles beside a growing ice barrier deserve closer attention.
But how does heat escape from your house through your attic to melt the snow, anyway?
Heat moves upward from living spaces through gaps around ceiling fixtures, attic hatches, wiring, and plumbing. Warm air can also escape where walls meet the ceiling. Bathroom exhaust ducts that end in the attic add moisture and warmth instead of carrying air outdoors. These pathways can create warm patches on the roof that melt the snow above them.
How common are ice dams?
Ice dams are most common in northern climates, where snow cover and freezing temperatures create repeated melt-and-refreeze conditions. Their occurrence varies with snowfall, roof shape, shade, attic heat loss, and drainage, so there’s no single frequency that applies to every home. A valley that repeatedly collects drifting snow may face greater seasonal risk than an exposed roof section with good drainage.