
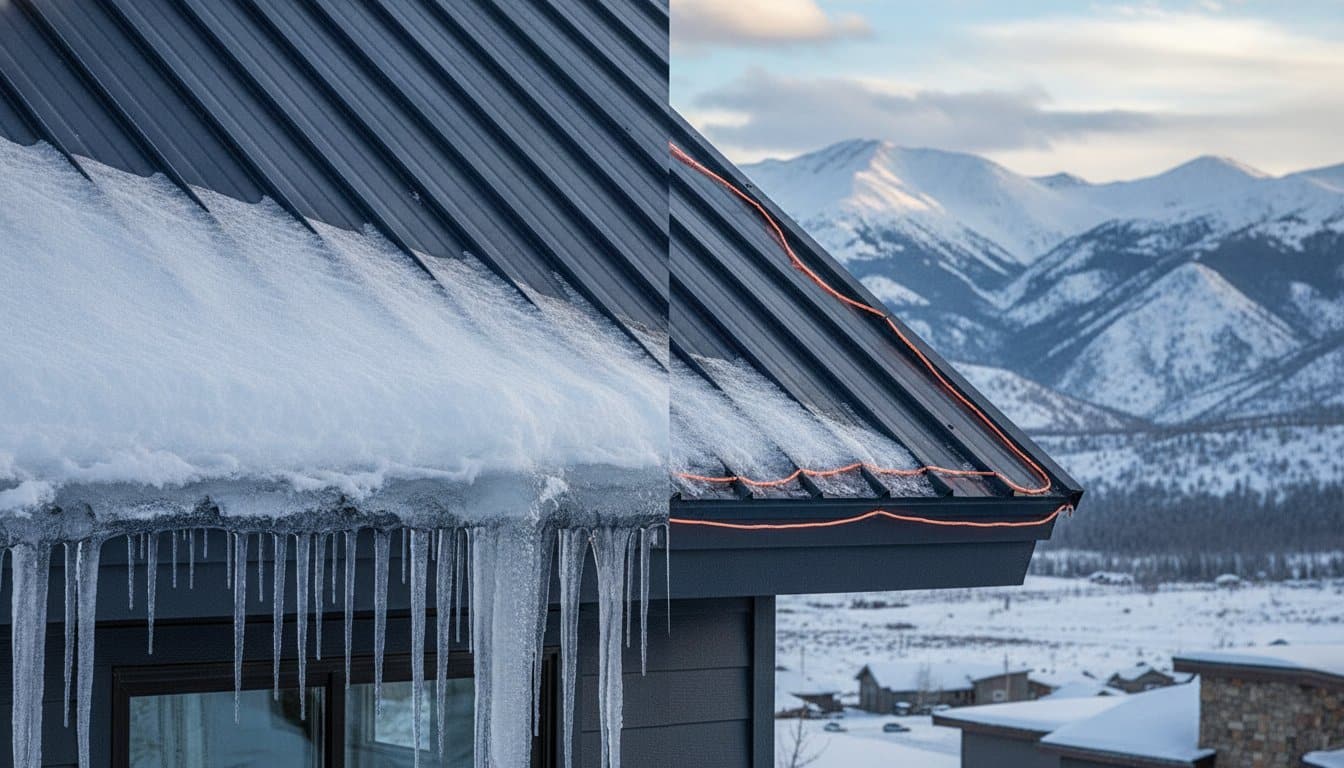
You might think the smooth, shed-ready surface of a premium metal roof makes it naturally immune to winter’s worst buildup, but for many homeowners, the reality is a dangerous surprise. While metal is durable, it’s also a highly efficient conductor of heat, which can lead to rapid freeze-thaw cycles that trap moisture right at your eaves. If you’re searching for how to prevent ice dams on a metal roof, you likely already know the frustration of seeing water marks on interior walls or hearing the thunderous sound of a snow slide crashing toward your porch.
We understand the stress of watching ice build up on a high-end investment, especially when you’re worried about damaging the finish with improper tools. This 2026 guide delivers the specific strategies and professional-grade systems required to stop ice dams from damaging your home interior and compromising your safety. We’ll break down the science of thermal management, from the necessity of self-regulating heat cables to the protective power of snow retention, ensuring your home remains a dry and secure sanctuary through the heaviest storms.
Key Takeaways
- Understand why a metal roof’s high thermal conductivity creates unique ice dam risks and how proper attic insulation serves as your first line of defense.
- Learn how to prevent ice dams on a metal roof by combining internal temperature control with professional-grade external heat-trace systems.
- Discover why self-regulating heat cables are the only safe choice for metal panels, offering superior durability and safety compared to standard hardware store heat tape.
- See how custom-designed snow retention systems protect your investment by preventing heavy snow slides from damaging your heat cables or perimeter walkways.
- Gain clarity on performing a winter audit to determine if your home requires a custom-engineered solution from a licensed electrical specialist.
Why Metal Roofs Develop Ice Dams (It’s Not What You Think)
Many homeowners choose metal for its durability and sleek look, assuming the smooth surface will naturally shed snow. However, metal roofs are actually highly susceptible to a specific type of winter failure. To understand what is an ice dam, you have to look at the eave. It’s a ridge of solid ice that forms at the very edge of your roof, acting as a structural plug that prevents liquid meltwater from draining into your gutters. When this happens, the water pools behind the ice and eventually finds its way into your home’s structural components.
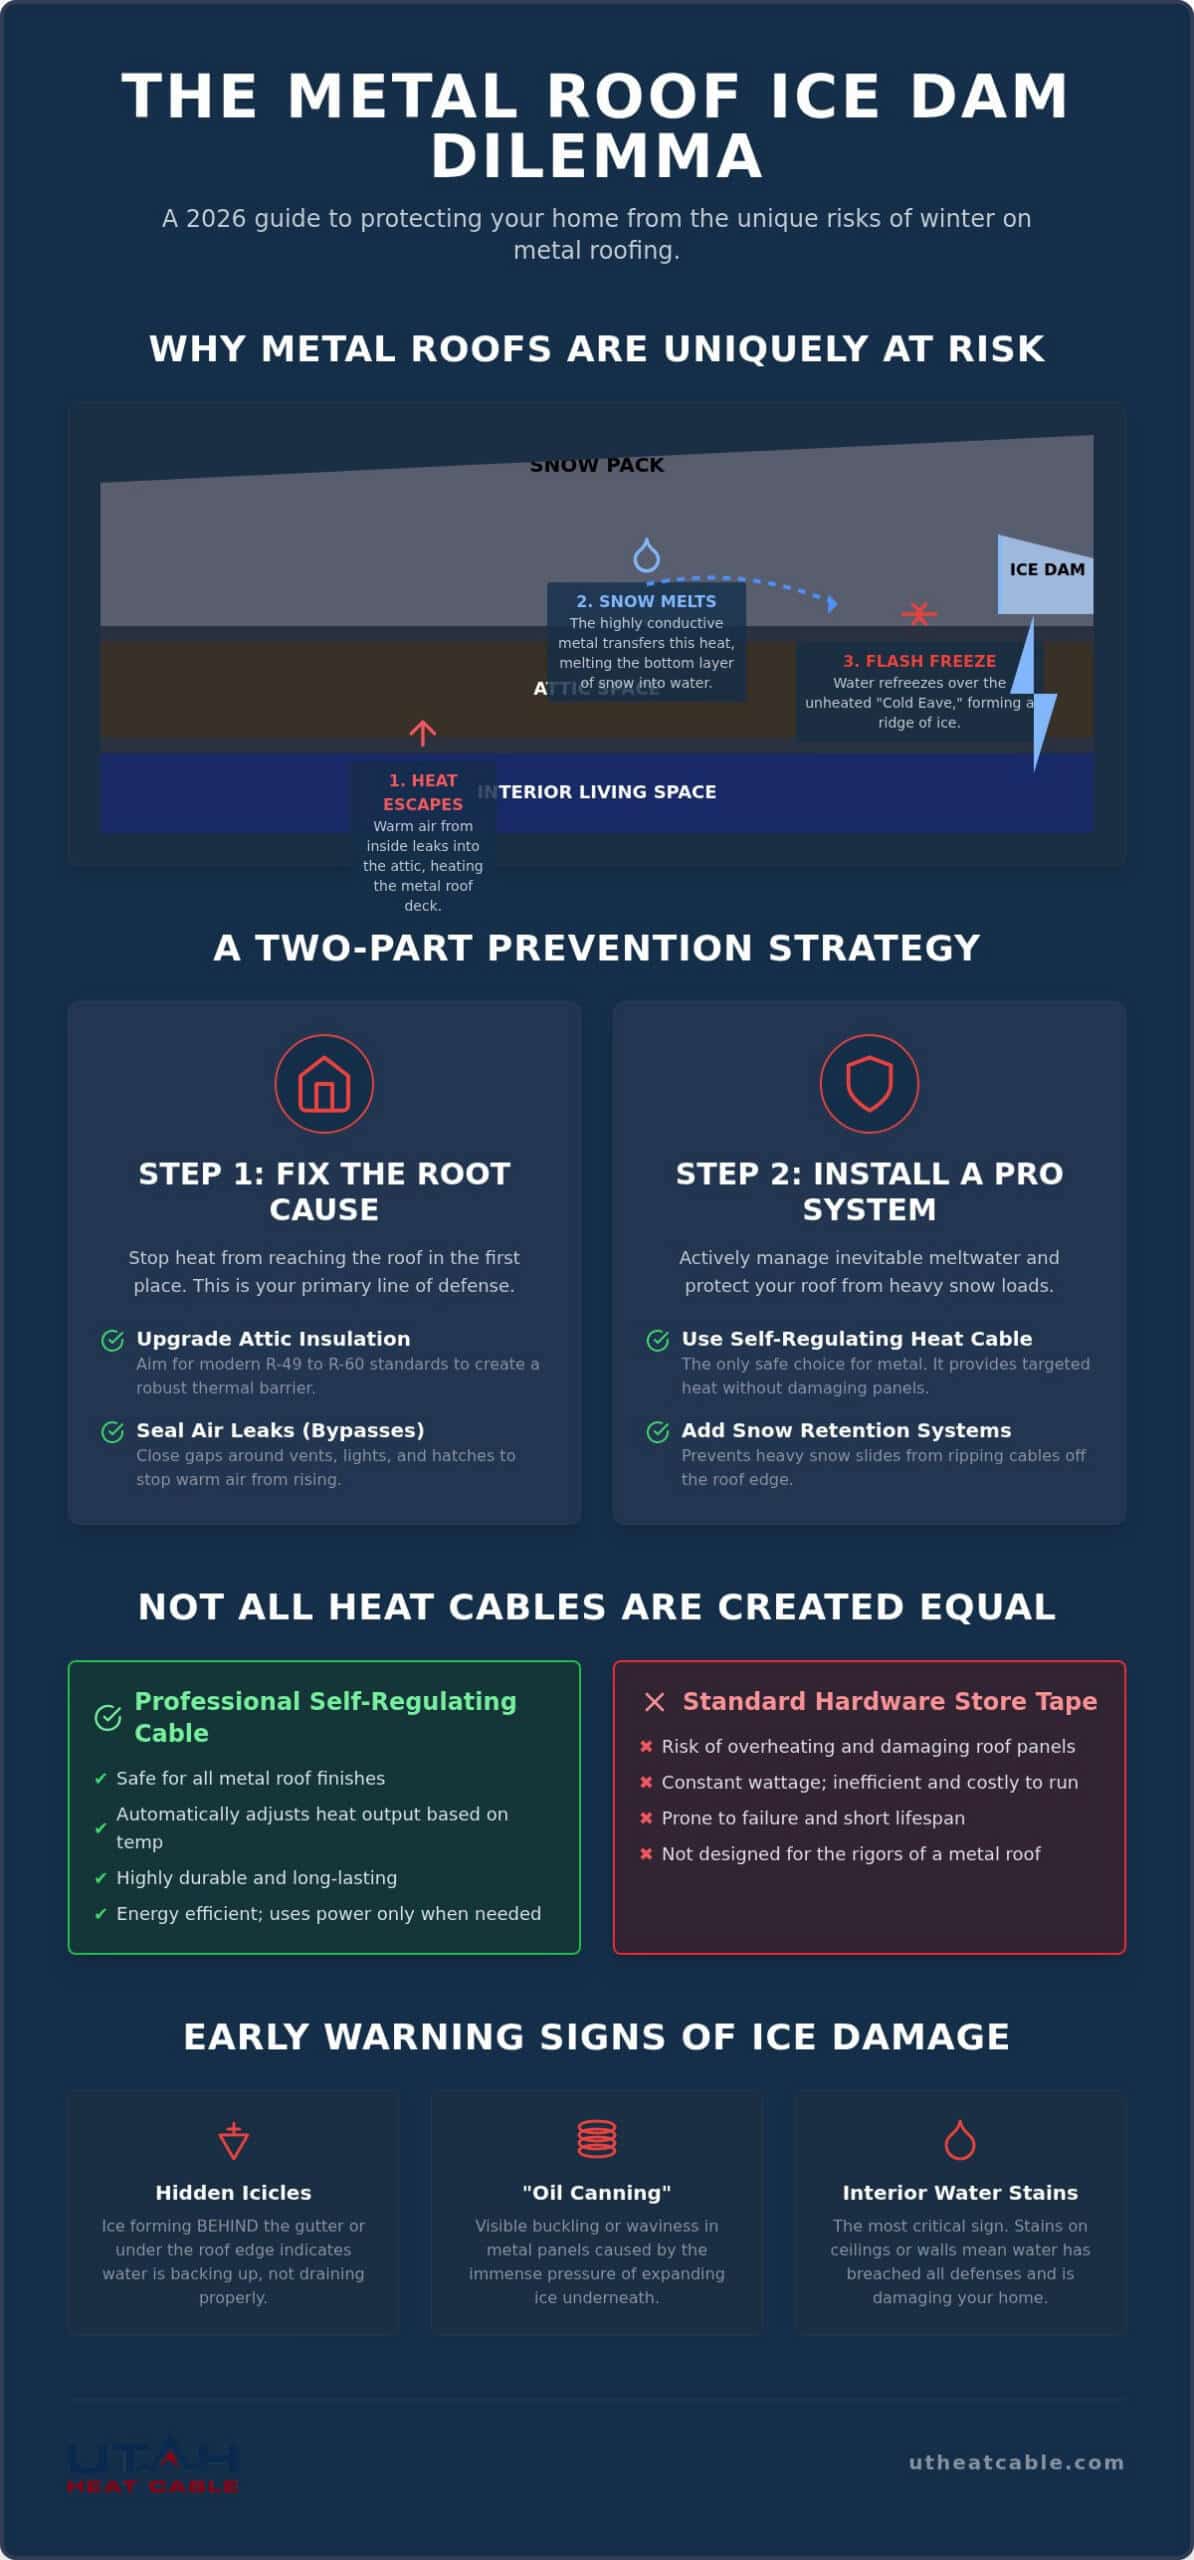
The primary culprit is thermal conductivity. Unlike asphalt shingles, which act as a buffer, metal is an exceptional conductor of heat. It pulls warmth from your attic and transfers it directly to the underside of the snowpack. This creates a hidden layer of water that flows down toward the “Cold Eave,” which is the portion of the roof that overhangs your exterior walls. Because this area isn’t warmed by the house, the water stops flowing and freezes instantly. This is why learning how to prevent ice dams on a metal roof requires more than just a shovel; it requires managing heat transfer.
The Physics of the Flash Freeze
When warm air leaks into your attic space, it creates a temperature imbalance across the metal panels. This warmth melts the bottom layer of snow, even when outside temperatures are well below freezing. As this water migrates toward the unheated overhang, it experiences a “flash freeze” that builds the dam higher with every passing hour. Thermal bridging occurs when metal fasteners or structural components create a direct path for interior heat to escape through the insulation and reach the outer roof surface. This localized heating accelerates the melting process, making the eventual freeze at the eave even more severe.
Common Signs of Metal Roof Ice Damage
Identifying a problem early can save thousands in repairs. While metal is tough, the pressure from expanding ice is immense. If you’re investigating how to prevent ice dams on a metal roof, watch for these specific indicators of a failing system:
- Hidden Icicles: Look for ice forming behind the gutter line or between the fascia and the metal panel. This suggests water is backing up under the metal’s edge rather than flowing over it.
- Oil Canning: This refers to the visible buckling or wavy appearance of metal panels, often caused by the physical stress of ice expansion within the seams or beneath the panels.
- Interior Warning Signs: Water stains on your ceiling or dampness behind interior walls near the roofline are clear signals that the dam has already forced water beneath the underlayment.
Many residents in heavy snow zones like Park City or Jackson Hole believe metal roofs are maintenance-free. While they are incredibly durable, they still require a proactive strategy for thermal management to stay functional during a harsh winter. Ignoring these signs often leads to costly interior damage and safety hazards around the house perimeter.
Fixing the Root Cause: Insulation and Attic Ventilation
To stop ice from forming, you must first address the heat escaping from your living space. The primary objective is to maintain a “cold roof” where the deck temperature mirrors the ambient outdoor air. Fixing the root cause of ice dams starts with a robust thermal barrier. If your attic is too warm, no amount of exterior work can fully compensate for the constant melting occurring beneath the snowpack. This internal temperature management is the foundation of how to prevent ice dams on a metal roof.
Heat often travels through attic bypasses. These are small, unsealed gaps around plumbing vents, recessed lighting fixtures, or attic access hatches. Because heat naturally rises, these openings act like mini-chimneys, funneling warm air directly against the underside of your metal panels. Sealing these leaks is just as important as adding more material. When you stop the air movement, you stop the energy transfer that fuels the freeze-thaw cycle at your eaves.
Optimizing Your R-Value for 2026 Standards
In regions like Utah and Wyoming, older building codes simply don’t provide enough protection against modern weather patterns. Current 2026 standards suggest aiming for R-49 to R-60 insulation levels in the attic. Fiberglass batts are a traditional choice, but they don’t stop air infiltration as effectively as modern alternatives. In metal roof applications, closed-cell spray foam is often the better investment because it creates a seamless air seal and adds structural rigidity. You can perform a quick check by measuring your insulation depth. If you can see the tops of your ceiling joists, your R-value is likely below R-30 and requires an upgrade to meet professional standards.
Balanced Ventilation Strategies
Effective ventilation uses the “Chimney Effect” to keep the attic space neutralized. This requires a balance between intake at the soffits and exhaust at the ridge. Metal roofs present a unique challenge because standard ridge vents can allow wind-driven snow to blow into the attic during a storm. You should use specialized closures designed for specific metal profiles that allow air to escape while keeping moisture out. A clear warning sign of a “hot roof” is seeing snow melt rapidly over the heated living spaces while thick ice remains over the unheated eaves. If your home is properly insulated but still struggles with local freeze-thaw cycles, a professionally designed heat trace system can bridge the gap between passive insulation and total property safety.
Professional Heat Trace Systems for Metal Panels
While insulation and ventilation provide the foundation for a cold roof, many homeowners in heavy snow regions find that passive measures aren’t enough. This is where active thermal management becomes necessary. While many residents look for ice dam prevention tips that involve manual snow removal, the most reliable way to maintain a clear eave is through a professional heat trace system. These systems don’t attempt to melt all the snow on your roof. Instead, they create dedicated drainage paths through the ice ridge, ensuring that liquid water can reach your gutters and downspouts without refreezing.
You should avoid the standard “heat tape” found at local hardware stores. These consumer-grade products are typically designed for temporary use on asphalt shingles and lack the durability required for metal panels. More importantly, they often lack the sophisticated internal controls needed to operate safely on a conductive metal surface. Learning how to prevent ice dams on a metal roof correctly involves moving away from “plug-and-play” tapes and toward engineered systems that can withstand the intense freeze-thaw cycles of the Intermountain West.
Self-Regulating vs. Constant Wattage
Self-regulating heat cable is the industry standard for a reason. These cables feature a specialized conductive core that adjusts its power output based on the surrounding temperature. When the roof is cold and covered in ice, the cable draws more energy to create a melt path. As the sun warms the metal panels, the cable naturally dials back its output, saving you money on your monthly utility bill. Constant wattage cables can overheat on metal surfaces because the metal reflects heat back into the cable, potentially damaging the panel finish or the cable itself. By choosing a self-regulating system, you’re investing in a solution that’s both energy-efficient and significantly safer for your home’s exterior finish.
Non-Penetrative Installation Techniques
A common fear among homeowners is that installing a de-icing system will require drilling holes into their expensive metal panels. This isn’t the case with professional installations. We utilize non-penetrative standing seam clamps, such as S-5! clips, which securely grip the vertical ribs of your roof without piercing the metal. This approach preserves your manufacturer’s warranty and prevents potential leak points. A complete system design includes:
- Zig-Zag Eave Patterns: These ensure the “Cold Eave” stays clear across the entire perimeter.
- Valley Tracing: This prevents ice from bridging the areas where two roof planes meet.
- Gutter and Downspout Loops: These keep the entire exit path open so water doesn’t freeze in the pipes.
Because these systems involve high-voltage electrical components in a wet environment, a licensed electrical contractor is required to ensure the installation is code-compliant. This professional oversight is a vital part of how to prevent ice dams on a metal roof while maintaining long-term safety and reliability.
The Role of Snow Retention in Ice Dam Prevention
A high-performance heat trace system is only as good as its ability to stay on your roof. Because metal panels are exceptionally smooth, they often experience “roof avalanches” where a massive shelf of snow slides off all at once. When hundreds of pounds of frozen mass move toward your eaves, the force is often enough to sheer off electrical components, gutters, and even structural trim. Understanding how to prevent ice dams on a metal roof requires a strategy that keeps snow stationary so your heat cables can do their job safely.
Snow retention systems provide a “static load” benefit. By holding the snow in place, these guards allow the heat trace to melt drainage paths slowly and consistently through the base of the snowpack. Without these guards, you risk a cycle where snow slides down, hits your heat cables, and either rips them out or piles up in a way that bypasses your drainage paths entirely. This creates a dangerous perimeter around your home and leaves your roof vulnerable to the very ice dams you are trying to avoid.
Protecting Your Investment
A single 500lb snow slide can destroy a gutter-mounted system in seconds. In the Intermountain West, where heavy, wet snow is common, engineering your retention system for local load requirements is vital. We typically recommend snow rails for standing seam roofs because they provide a continuous barrier that distributes the weight across the structural ribs. For smaller sections or specific architectural styles, individual pad-style guards can be used. These systems are designed to match the aesthetics of your architectural metal roof, ensuring that your safety measures don’t compromise your home’s curb appeal. Strategic placement is especially critical above entryways, garage doors, and expensive landscaping where a sudden slide could cause significant property damage or injury.
Integrated System Design
The most effective winter protection plans treat snow retention and heat trace as a single, integrated unit. A common mistake is placing heat cable below the snow guard line without enough clearance, which can lead to the cable being crushed or moved during minor shifts in the snowpack. Your system should be designed so the guards hold the bulk of the weight while the cables maintain clear channels for the resulting meltwater. You should perform annual checks before the first frost to ensure all clamps are tight and no cables have shifted. If you are ready to secure your home against the weight of winter, you can request a custom snow retention and heat trace design that is tailored to your specific roof pitch and local weather patterns.
Next Steps: Designing Your Custom Prevention Plan
Before the first flurry hits, you should conduct a thorough winter audit of your property. Start by identifying where icicles clustered most heavily last year and note any areas where snow slides previously damaged your landscaping. These observations are the first step in learning how to prevent ice dams on a metal roof effectively. While some homeowners consider a DIY approach, the combination of high-voltage electricity and steep, slippery metal surfaces makes professional installation a matter of basic safety. A professional system also protects your expensive roof warranty, as improper fasteners or generic heat tape can void the protections provided by your metal panel manufacturer.
The long-term ROI of a professional system is found in the expensive damage you don’t have to repair. You’re avoiding interior drywall work, structural attic repairs, and the frequent replacement of mangled gutters. In the Intermountain West, our freeze-thaw cycles are particularly aggressive. Local expertise matters because a system designed for a milder climate will often fail in the high-altitude conditions of Park City, Jackson Hole, or the Boise foothills. We design our systems to thrive in these specific regional challenges.
Consulting with Utah Heat Cable
Our process begins with a comprehensive site evaluation and custom system design. We don’t just install products; we engineer layouts that account for your roof’s unique pitch, orientation, and sun exposure. As a licensed electrical contractor, we ensure every installation meets the specific electrical codes in Utah, Idaho, and Wyoming. This professional certification is your guarantee that the system is safe for your family and your property. If you’re ready to start your project, you can Request a professional roof de-icing consultation to see how we can secure your home for years to come.
Preparing for the 2026 Winter Season
The ideal time to install these protective systems is during the late summer or early fall. Waiting until snow is already on the ground makes installation dangerous and often impossible for our crews. For the upcoming 2026 season, we recommend integrating automated controller options into your design. These smart sensors detect both moisture and temperature, activating the system only when the weather conditions require it. It’s a “set it and forget it” solution that provides total peace of mind. You can rest easy knowing your metal roof is shielded from the next major storm, even when you aren’t home to monitor the eaves.
Securing Your Home for the Seasons Ahead
Managing winter weather on a metal roof requires more than just reacting to the first heavy snowfall. By addressing the root cause through attic insulation and installing an integrated system of self-regulating heat cables and snow retention, you create a permanent shield for your property. You’ve learned that how to prevent ice dams on a metal roof involves a precise balance of internal thermal control and external drainage paths. These systems work together to keep your eaves clear and your walkways safe from dangerous snow slides throughout the season.
Utah Heat Cable stands ready to help you navigate these regional environmental challenges. As a Licensed Electrical Contractor specializing in Custom Heat-Trace Design, we understand the specific freeze-thaw cycles that impact homes throughout Utah, Idaho, and Wyoming. Don’t wait for the next major storm to reveal vulnerabilities in your roof’s performance. You can protect your home from ice dams-get a custom heat trace quote today and gain the peace of mind that comes from professional-grade protection. We look forward to helping you keep your home dry and secure for many winters to come.
Frequently Asked Questions
Can heat cables damage the finish on my metal roof?
Professional-grade self-regulating heat cables will not damage your roof’s finish when installed correctly. Unlike constant wattage cables that can reach high temperatures, self-regulating cores limit their heat output based on the surrounding environment. Using non-penetrative standing seam clamps ensures that your panels remain unpierced, preserving the manufacturer’s warranty and the aesthetic integrity of the metal coating for years to come.
Is it better to have a snow retention system or heat cables on a metal roof?
These two systems serve different but equally important roles in property protection. Snow retention prevents dangerous roof avalanches, while heat cables maintain the drainage paths necessary for meltwater. For most homes in high-snow zones like Utah or Idaho, an integrated design using both is the only reliable way to ensure long-term protection for the structure and the de-icing equipment itself.
How much does it cost to run a roof heat cable system all winter?
Operational costs depend on your local utility rates and the total length of the cable installed. Because self-regulating technology only draws significant power when temperatures drop, the system is much more efficient than older constant-wattage styles. Adding an automated controller can further reduce energy consumption by ensuring the system only runs when moisture is present and temperatures are in the freezing range.
Do I need to install heat cables in my gutters and downspouts too?
Successful de-icing requires a clear path from the roof all the way to the ground. If you only heat the eaves, the meltwater will simply freeze once it hits a cold gutter or downspout. This creates a secondary blockage that can cause water to back up under your metal panels, leading to interior leaks and structural damage that can be costly to repair.
Why is my metal roof leaking if there isn’t a visible ice dam?
Leaks can occur through capillary action even if a large ice ridge isn’t visible from the ground. Water can be pulled into horizontal seams or around fasteners if there is any minor obstruction at the eave. This is why a winter audit is helpful to identify hidden moisture entry points that might be caused by small, localized ice buildups beneath the snowpack.
Can I use a roof rake on a metal roof to prevent ice dams?
While roof rakes can remove snow, they often scratch the protective finish of metal panels and can even dent the metal if used improperly. It’s also physically demanding and dangerous to use a rake on a multi-story home. A permanent heat-trace system is a safer and more effective method for how to prevent ice dams on a metal roof without risking your physical safety.
How long do professional-grade self-regulating heat cables last?
Industrial-grade self-regulating cables generally have a lifespan of 10 to 20 years when properly maintained. To maximize this longevity, it’s vital to protect the cables from the physical weight of sliding snow with a snow retention system. Regular seasonal inspections also help identify any minor issues, such as loose clips or debris, before they lead to a system failure during a major storm.
What is the best temperature to turn on my roof heat cables?
You should activate your system when the temperature is between 30 and 40 degrees Fahrenheit and snow is present. The goal is to have the drainage paths open before the flash freeze occurs at the eaves. Most homeowners prefer using automated controller options that use sensors to manage these cycles, providing a reliable and energy-efficient solution for how to prevent ice dams on a metal roof.