
Imagine waking up to the rhythmic thud of water dripping inside your bedroom wall while a massive shelf of ice hangs precariously over your front door. It’s a helpless feeling that many homeowners in Utah and Idaho face during our intense freeze-thaw cycles. You know that every minute the water leaks, the potential for structural damage grows, yet the idea of climbing a frozen ladder with a hammer is rightfully terrifying. You need to know how to remove an ice dam safely, without voiding your roof warranty or risking a dangerous fall.
We agree that your home should be a sanctuary, not a source of winter anxiety. This guide provides the safest methods for immediate ice removal and explains how to transition to a permanent, professional-grade prevention system. We’ll cover why low-pressure steam is the only way to protect your shingles and how specialized heat cables can stop the ice before it ever starts.
Key Takeaways
- Identify the critical “danger zone” where ice traps meltwater and learn how to use a roof rake safely to halt further dam growth.
- Discover how to remove an ice dam using low-pressure steam, the only professional method that clears ice without stripping granules or voiding your warranty.
- Understand the technical difference between gentle wet steam and high-pressure washers to ensure your emergency removal doesn’t lead to permanent roof damage.
- Learn why standard insulation often falls short in Utah and Idaho and how self-regulating heat cables provide a permanent, active defense against recurring ice.
Immediate Actions: How to Safely Manage an Ice Dam in an Emergency
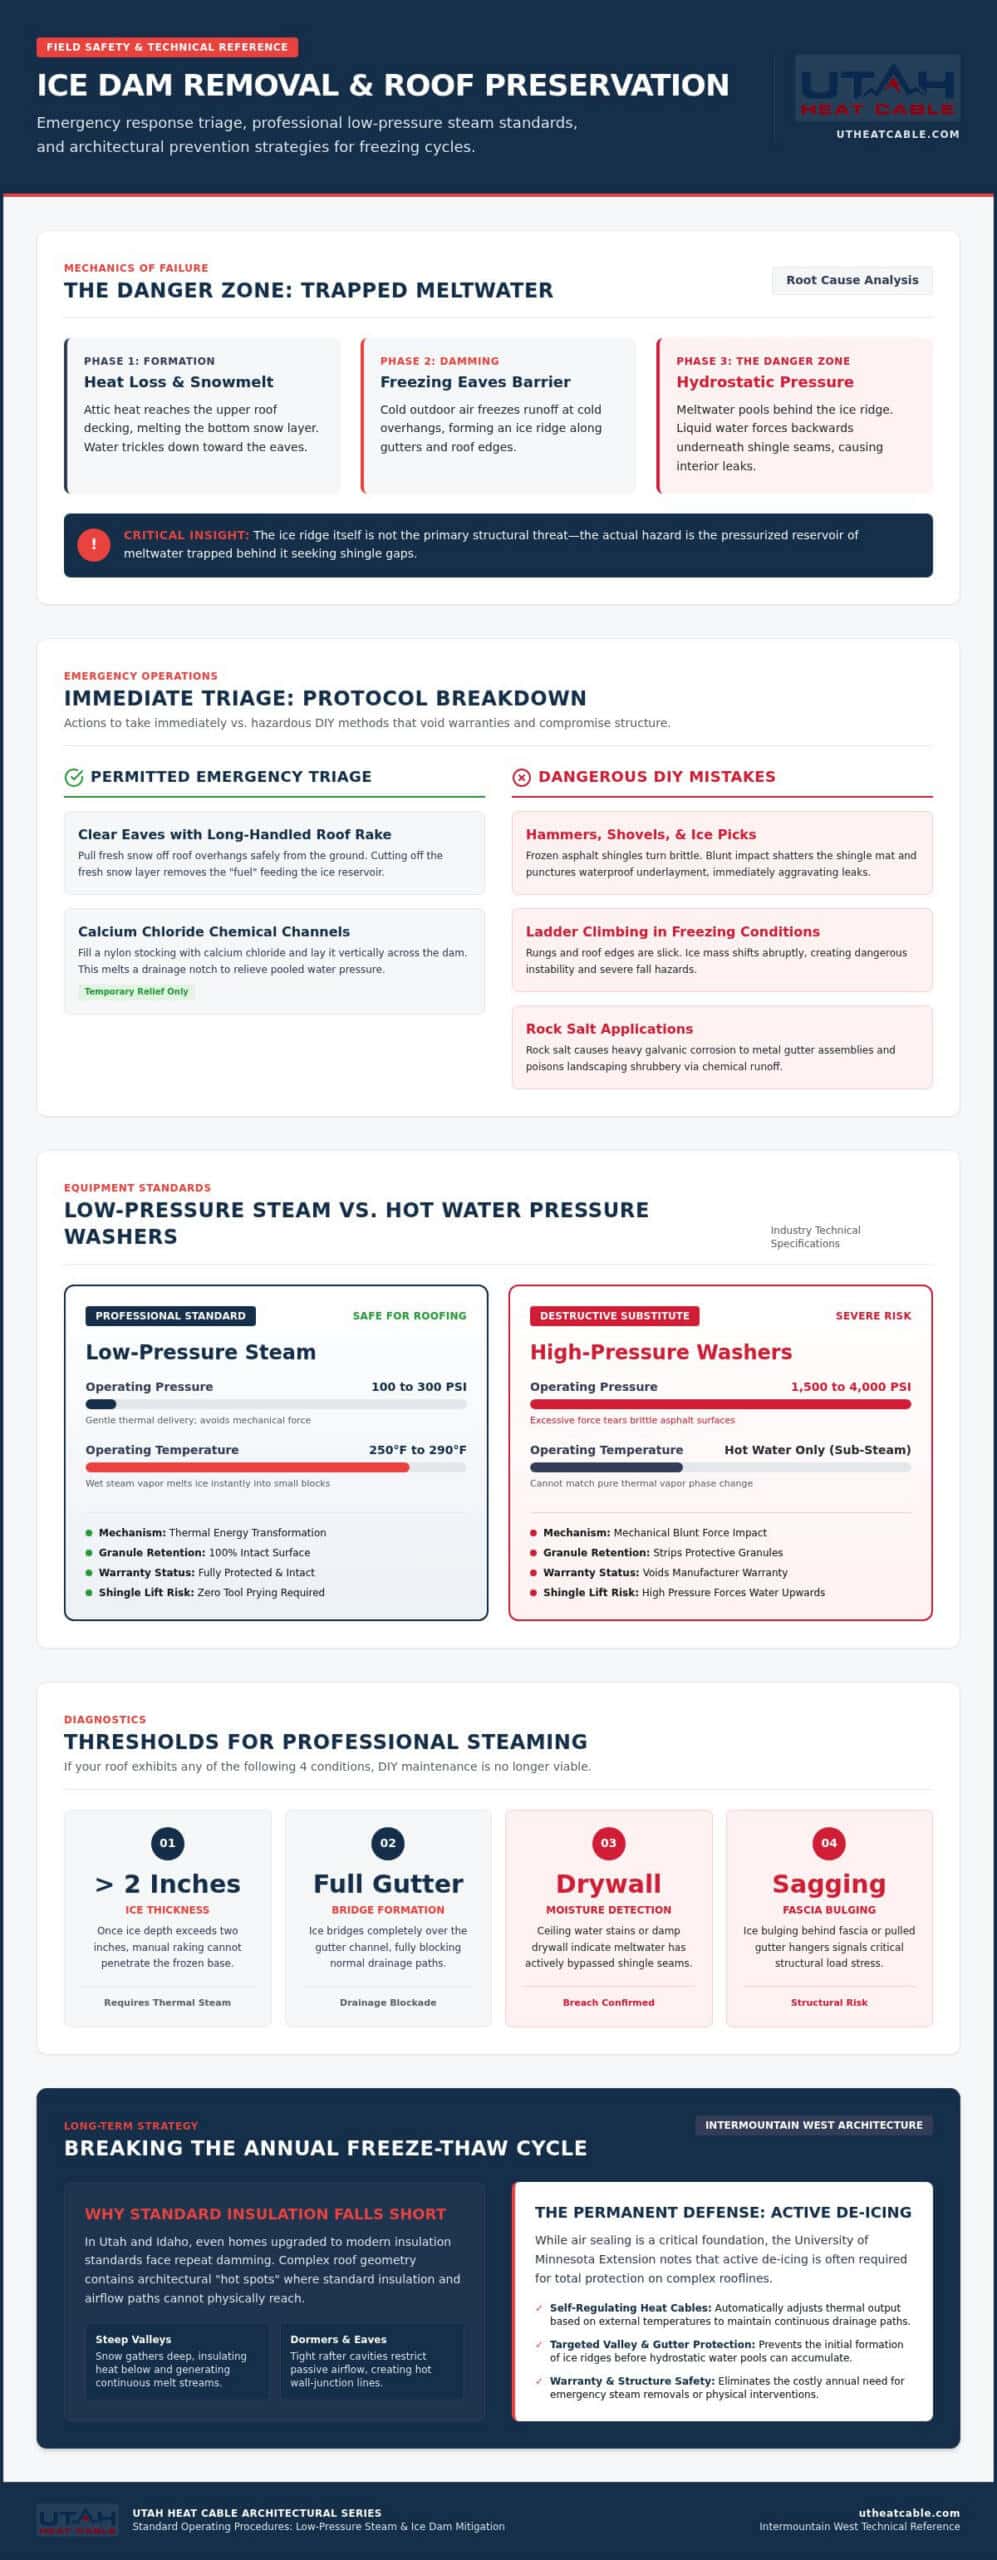
When you are deciding how to remove an ice dam during a storm, identifying the “danger zone” is your first step. This refers to the reservoir of trapped meltwater pooling behind a ridge of ice at your roof’s edge. This liquid water is what leads to interior leaks, as it finds the path of least resistance through shingle seams. Understanding ice dam formation and dynamics is key to realizing that the ice itself isn’t the primary threat; it’s the pressure of the water sitting behind it.
If you are wondering how to remove an ice dam in a pinch, start by clearing fresh snow from your eaves with a long-handled roof rake. Removing the “fuel” for the dam helps slow its growth. For active leaks, you can create temporary drainage channels by filling a nylon stocking with calcium chloride and laying it vertically across the ice. Avoid rock salt, as it corrodes gutters and kills landscaping. While calcium chloride socks can provide temporary relief, they are a triage measure, not a structural solution.
The “Donts” of DIY Removal: Avoiding Costly Structural Damage
In a panic to stop a leak, many homeowners reach for hammers, ice picks, or shovels. This is a mistake. Frozen asphalt shingles are brittle; one misplaced strike can shatter the shingle mat or puncture the underlayment, instantly worsening the leak. Similarly, high-pressure washers are not the answer. They operate at 1,500 to 4,000 PSI, which strips protective granules and voids most manufacturer warranties. Safety remains the highest priority. Never climb a ladder during an icing event, as surfaces are slick and the weight of the ice makes the structure unstable. For long-term peace of mind, it’s best to consult our need-to-know resources before attempting risky repairs.
Professional Ice Dam Removal: Why Low-Pressure Steam is the Standard
When homeowners search for how to remove an ice dam, they often encounter contractors using hot water pressure washers. This is a dangerous substitution. While a pressure washer uses blunt force to break ice, low-pressure steam machines operate at roughly 100 to 300 PSI. This gentle approach relies on thermal energy rather than mechanical impact. By using “wet steam” at temperatures between 250°F and 290°F, specialists melt the ice into manageable chunks without the “shingle-lift” caused by prying tools. As noted in the University of Minnesota Extension’s guide on ice dams, avoiding aggressive mechanical removal is essential for preventing moisture intrusion and mold.
Hiring a specialist ensures that drainage paths are cleared systematically. A professional understands how to navigate complex roof valleys and gutter systems without compromising the roof’s integrity. If you’re unsure how to remove an ice dam that has already reached several inches in thickness, professional intervention is the safest path forward. For a deeper look at the physics of your roof, our Need To Know guide explains the mechanics of heat loss and ice formation. Our specialized de-icing services can provide a safe, immediate resolution.
Identifying When an Ice Dam Requires Professional Intervention
Not every icicle is an emergency, but certain signs demand immediate attention. If you notice water stains on your ceiling or feel moisture behind your drywall, the dam has already breached your shingles. Structural red flags like sagging gutters or ice bulging behind the fascia board indicate that the weight is stressing your home’s exterior. Generally, once ice thickness exceeds two inches or completely bridges the gutter, DIY methods like raking are no longer effective. At this stage, professional steaming is the only way to restore proper drainage without causing further damage.
Breaking the Cycle: Transitioning from Removal to Permanent Prevention
Learning how to remove an ice dam is a vital skill for winter survival in the Intermountain West, but relying on emergency steaming every year is an exhausting and expensive cycle. Many homeowners find that even after upgrading their attic insulation to modern standards, ice still forms in specific areas. This is because complex roof designs often feature architectural “hot spots” like steep valleys or dormers where traditional insulation and ventilation simply cannot reach. According to the University of Minnesota Extension guide to dealing with and preventing ice dams, while air sealing is a critical first step, active de-icing is often necessary for total protection.
If you are tired of researching how to remove an ice dam every February, it is time to consider a permanent solution. Investing in custom heat-trace designs offers a much higher return on investment than repeated emergency calls. The cost of a single interior remediation project, including drywall repair and mold abatement, far outweighs the price of a preventative system. A professional installation acts as a permanent drainage path, ensuring that meltwater reaches the ground instead of your living room.
The Role of Self-Regulating Heat Cables in Long-Term Protection
Self-regulating technology is the professional standard for active de-icing because it automatically adjusts its thermal output based on the ambient temperature. When the roof is frozen, the cable draws more power to clear a path; as the sun comes out and the roof warms, the cable reduces its output to save energy. Because these systems involve high-voltage components installed on a wet roof, professional installation by a licensed electrical contractor is mandatory for safety and code compliance. A specialist ensures your system is properly grounded and utilizes the right controller options to prevent circuit overloads. We strongly advise against using basic hardware store heat tape, as explained in our guide on Professional vs DIY Heat Tape: Safety First.
Secure Your Home Against the Next Winter Storm
Winter in the Intermountain West is relentless, but your roof doesn’t have to be a casualty of the season. While knowing how to remove an ice dam using emergency triage can stop an immediate leak, lasting security requires a shift from reactive repairs to proactive protection. Professional low-pressure steaming remains the gold standard for safe removal; however, the most cost-effective path is ensuring the ice never forms in the first place.
As a licensed electrical contractor, we specialize in high-performance self-regulating cable systems tailored for the unique climates of Utah, Idaho, and Wyoming. These custom designs provide the automated, energy-efficient defense your property deserves. Don’t wait for the next heavy snowfall to worry about structural damage. You can request a custom de-icing quote from Utah Heat Cable today to find a permanent solution. Your home is your greatest investment; let’s work together to keep it dry and protected all season long.
Frequently Asked Questions
Is it safe to use a pressure washer to remove an ice dam?
No, it’s not safe to use a high-pressure washer on your roof. These machines operate at thousands of pounds per square inch, which can easily strip the protective asphalt granules from your shingles and void your manufacturer’s warranty. If you are looking for how to remove an ice dam safely, low-pressure steam is the only professional standard that protects your roof’s structural integrity.
What is the best chemical to melt ice on a roof without damaging shingles?
Calcium chloride is the most effective chemical for melting roof ice while minimizing damage to your property. Unlike standard rock salt, which corrodes metal gutters and kills surrounding landscaping, calcium chloride works at lower temperatures and is gentler on asphalt shingles. For the best results, place the crystals in a nylon stocking to create a vertical drainage channel through the ice buildup.
How much does professional steam ice dam removal cost in Utah?
Professional de-icing costs in Utah and Idaho vary significantly based on the severity of the buildup and the height of your roof. Factors such as the total linear footage of the dam, the thickness of the ice, and ease of access for steaming equipment all influence the final investment. Most specialists charge by the hour with a minimum service fee to cover equipment setup.
Can I prevent ice dams without replacing my entire roof?
Yes, you can effectively prevent ice dams without a full roof replacement. While improving attic insulation and air sealing helps, many Utah homes have architectural hot spots where heat still escapes. Installing a professional system of self-regulating heat cables provides an active defense that clears drainage paths automatically. This approach is often a more affordable and immediate solution than major structural renovations or total roof overhauls.